Blog
Knife Conceptual Ad
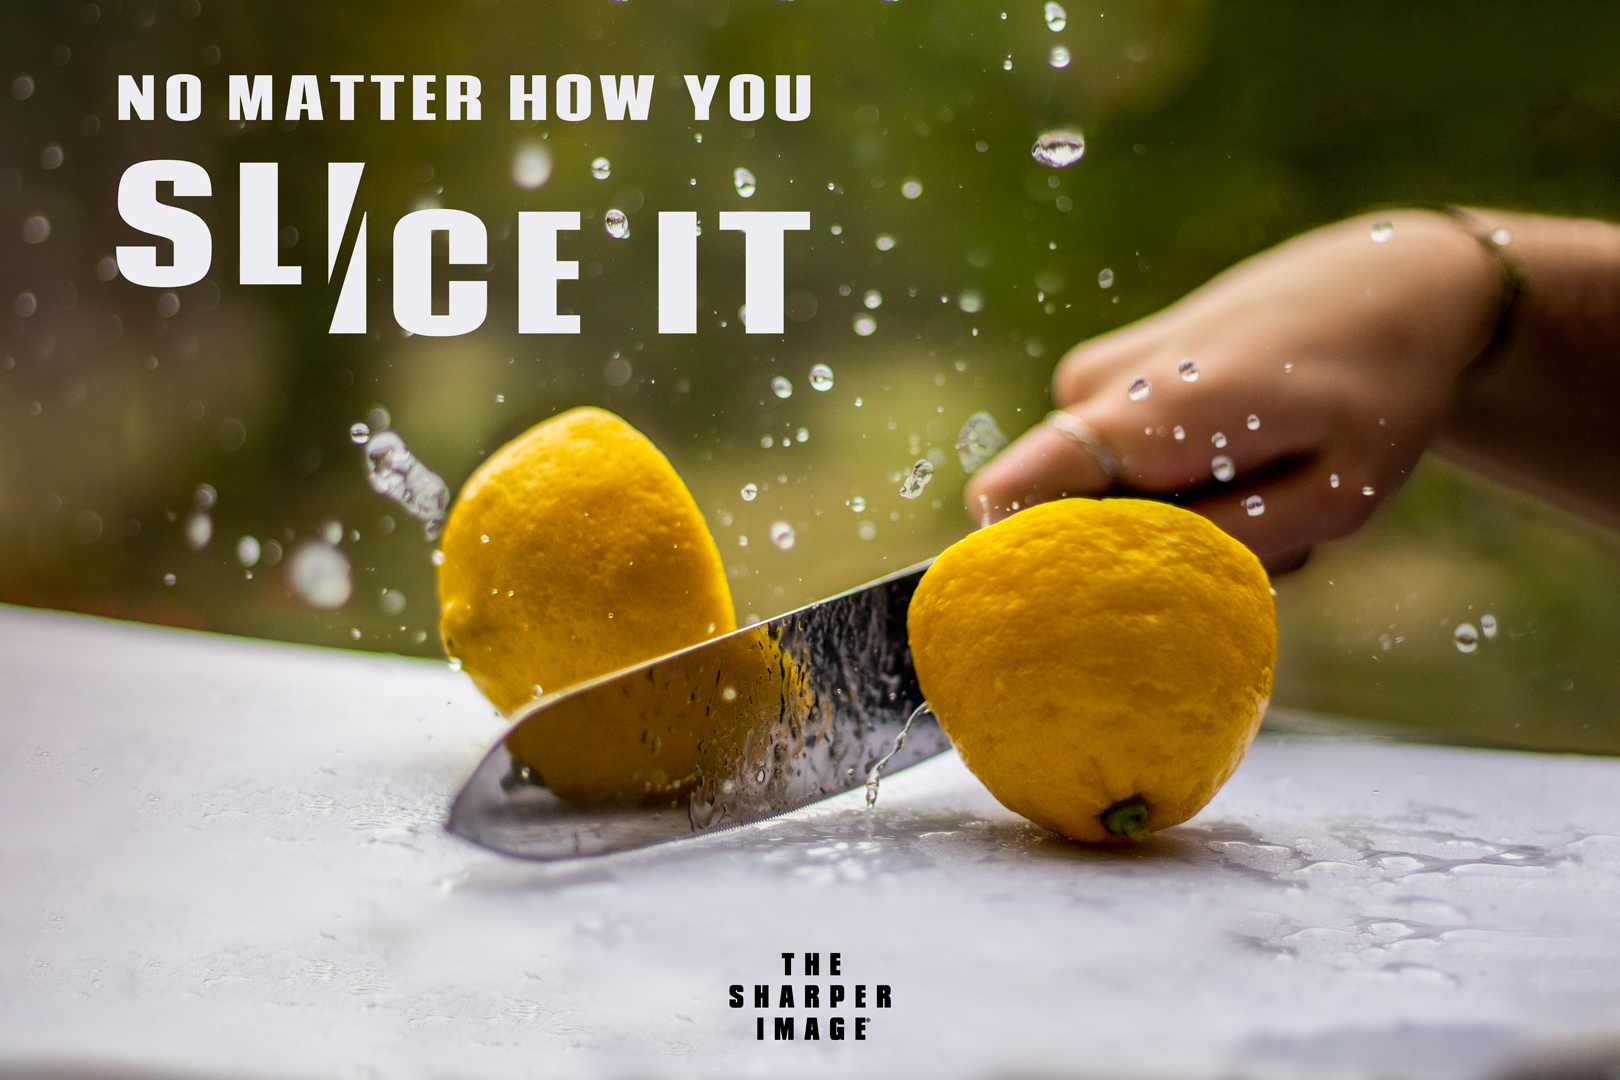
The Sharper Image knife conceptual ad.
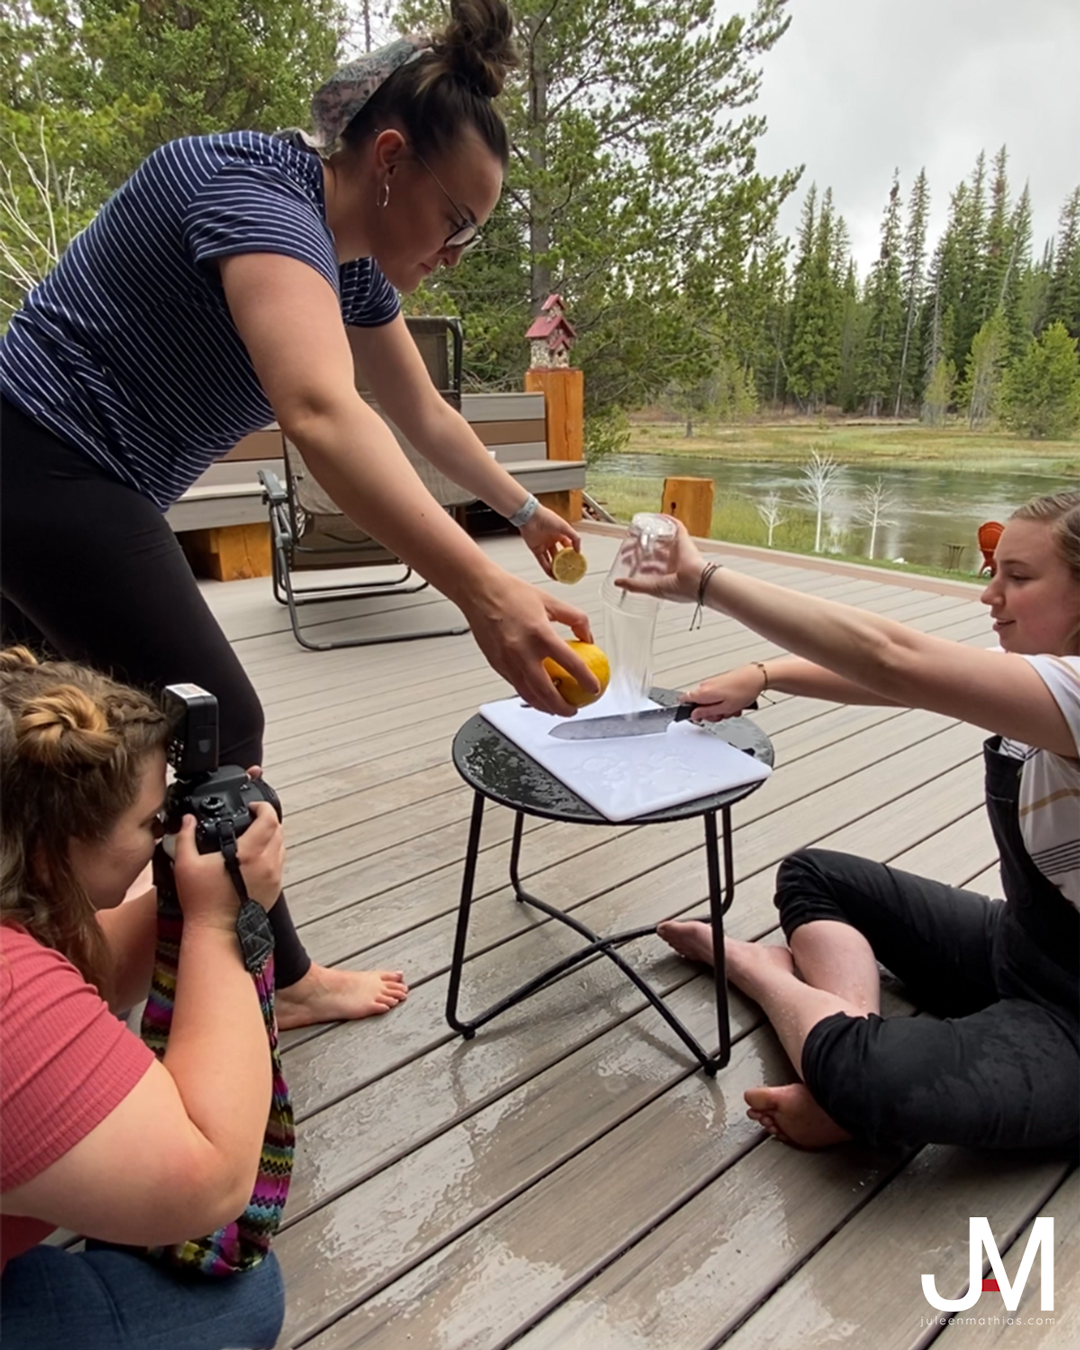
Conceptual ads are a creative way to display photography in a unique way. My take on a knife conceptual ad was to photograph a knife slicing through a lemon. To make it look like the knife had cleanly sliced the lemon, I had two people help me create this shot. One person held the knife and dumped a cup of water onto the cutting board. The other person threw two halves of a lemon together at the knife. Here’s the setup:
With that setup, I was able to capture the split second of this shot:
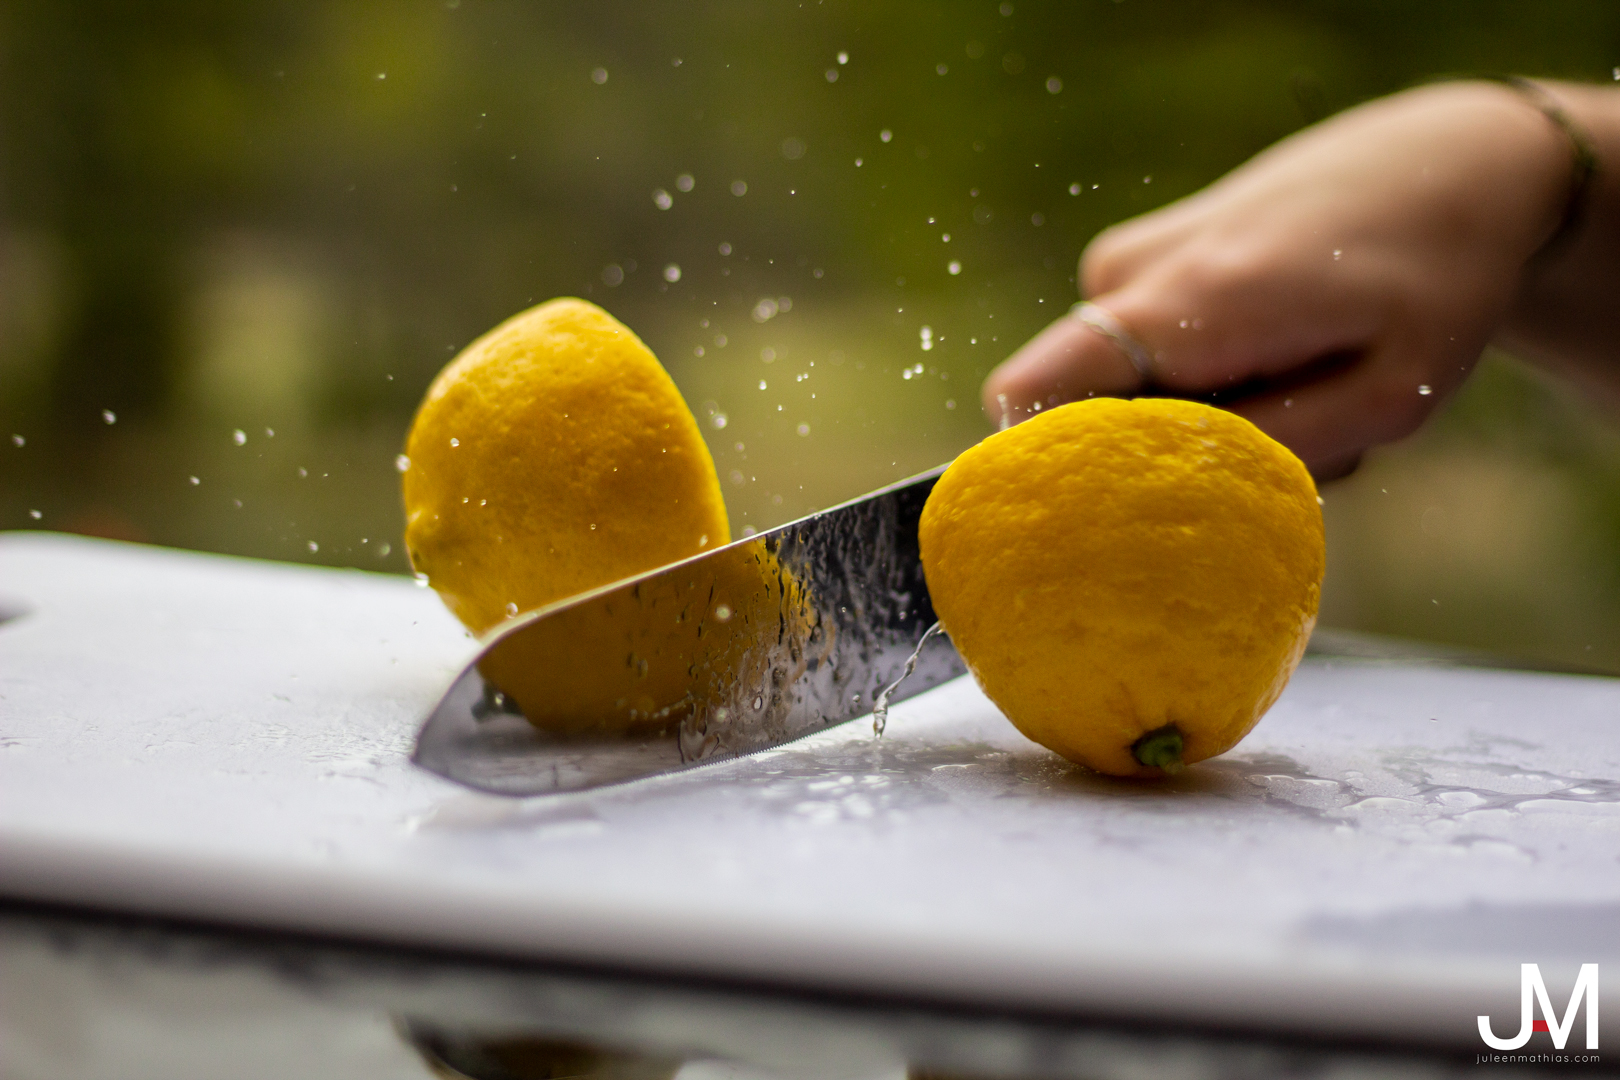
With this shot, I brought it into photoshop and edited some water droplets from another photo I snapped during this shoot since this one didn’t have much. I then added text and the logo. The text looked a little harsh, so I created a soft gradient in the corner to help it blend better.
And with that, I was able to design the final creative ad!
Fine Art Printing
Preparing an image for fine art printing.
Have you ever wanted to mount your favorite photo on the wall to show off to others? That’s what fine art printing can do for you. If you have a high-quality printer, you can print from home. If not, you may want to pay for a company to print it. I always opt to send my photos to another company to print so I can receive the print on metallic paper.
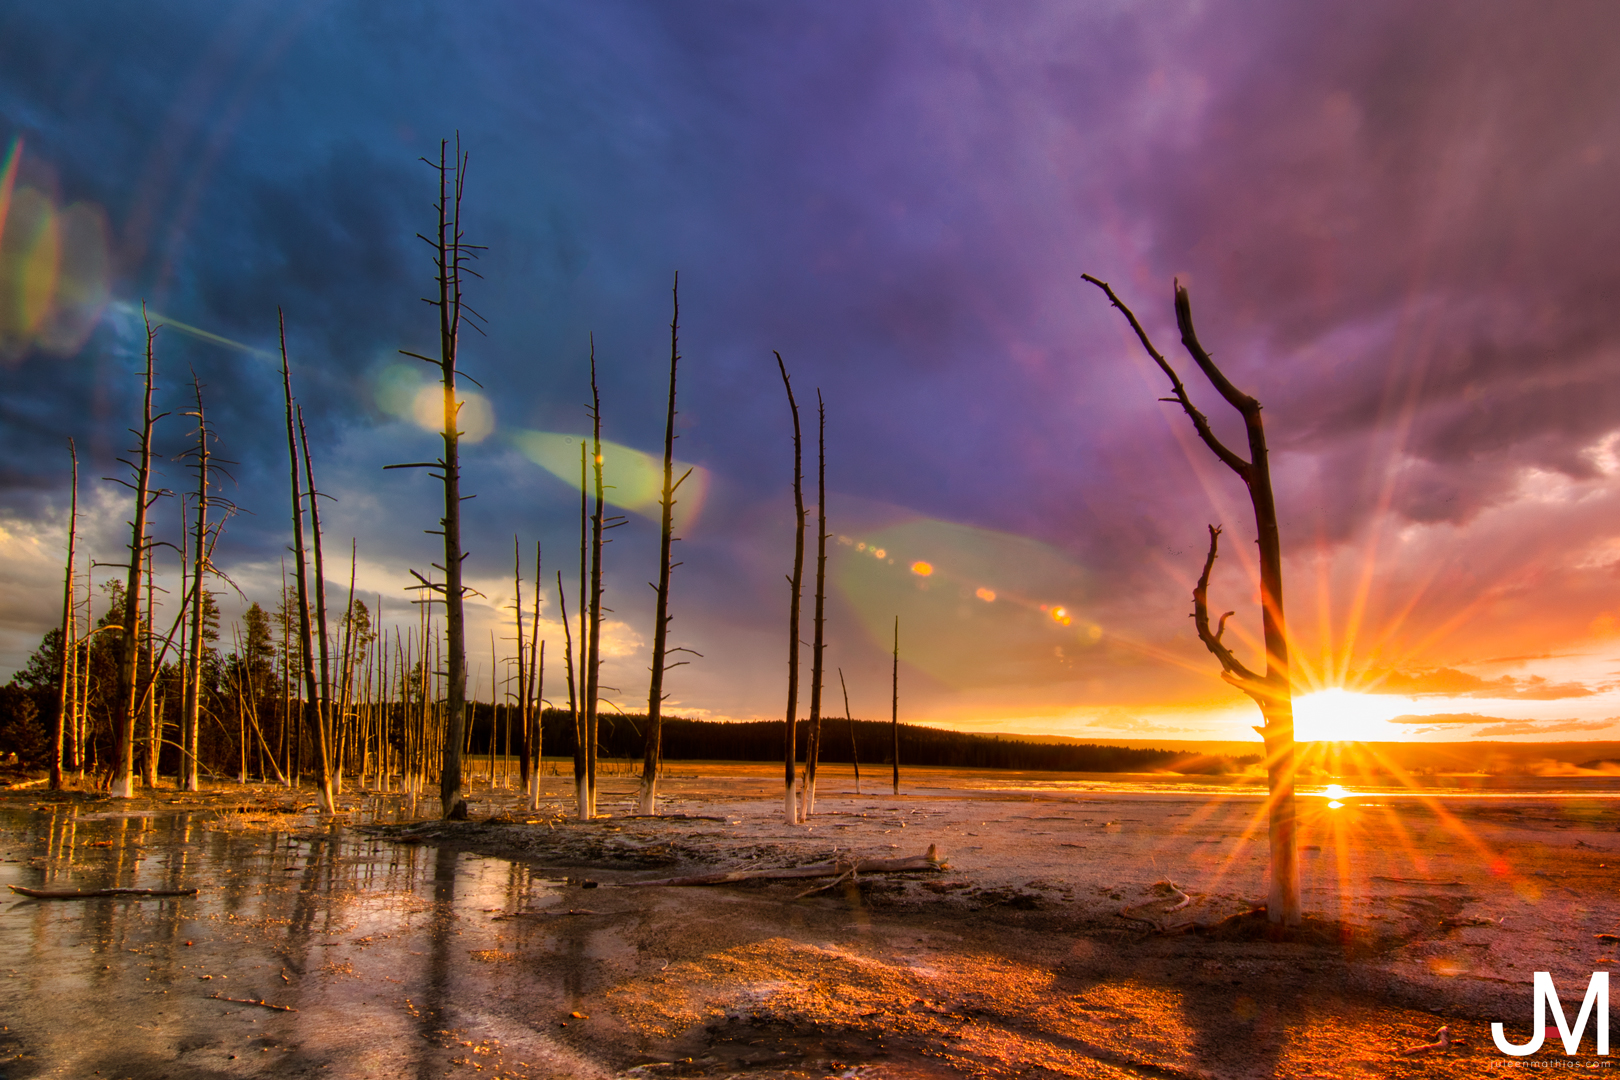
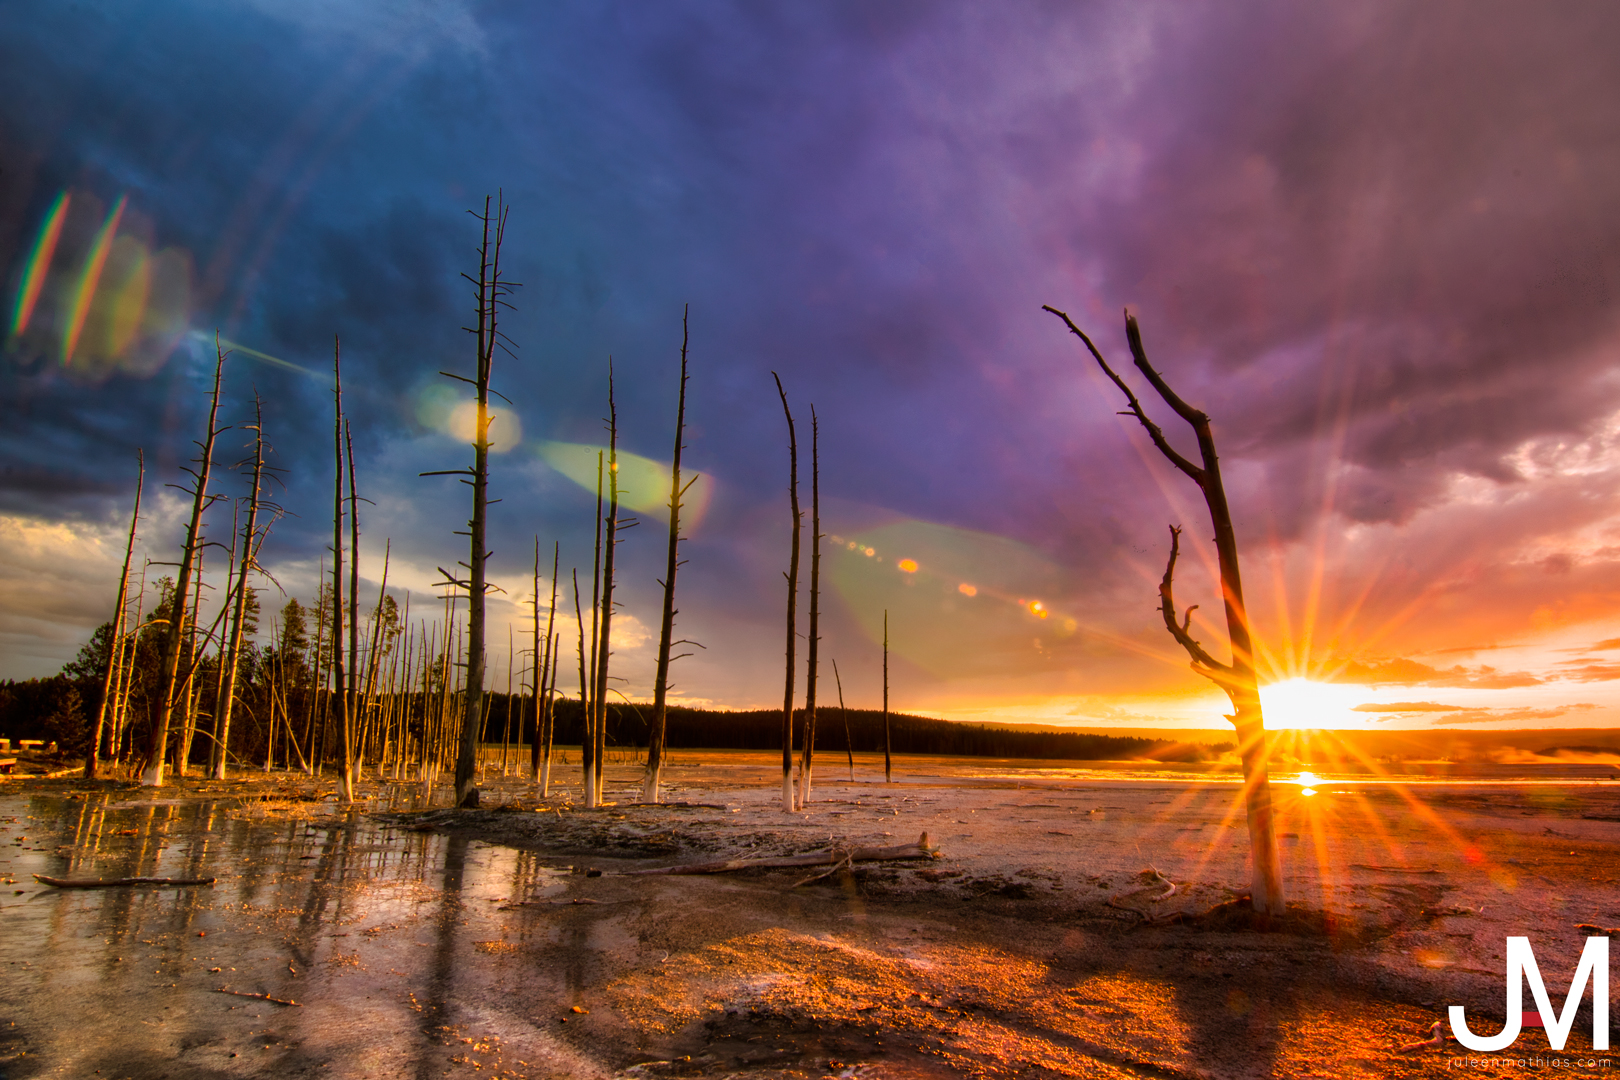
This photo was taken in Yellowstone during the sunset. I had my camera propped on a tripod and turned on bracketing. The initial shutter speed was at 0.6 seconds, with an aperture of f/22 and ISO 100. By using a f/22, I was able to capture the sun glare in this composition.
In post-production, I merged the bracketed images together and enhanced the colors. I also sharpened up the foreground and used dodge and burn to enhance the highlights and shadows.

This is a mockup of how I would want the photo to look once it is framed and hanging on the wall after the fine art printing.
On Location Portraits
Capturing beautiful on location portraits.
When capturing on location portraits, natural lighting and reflectors will be your best friend. Although, nothing beats having some softbox lighting.
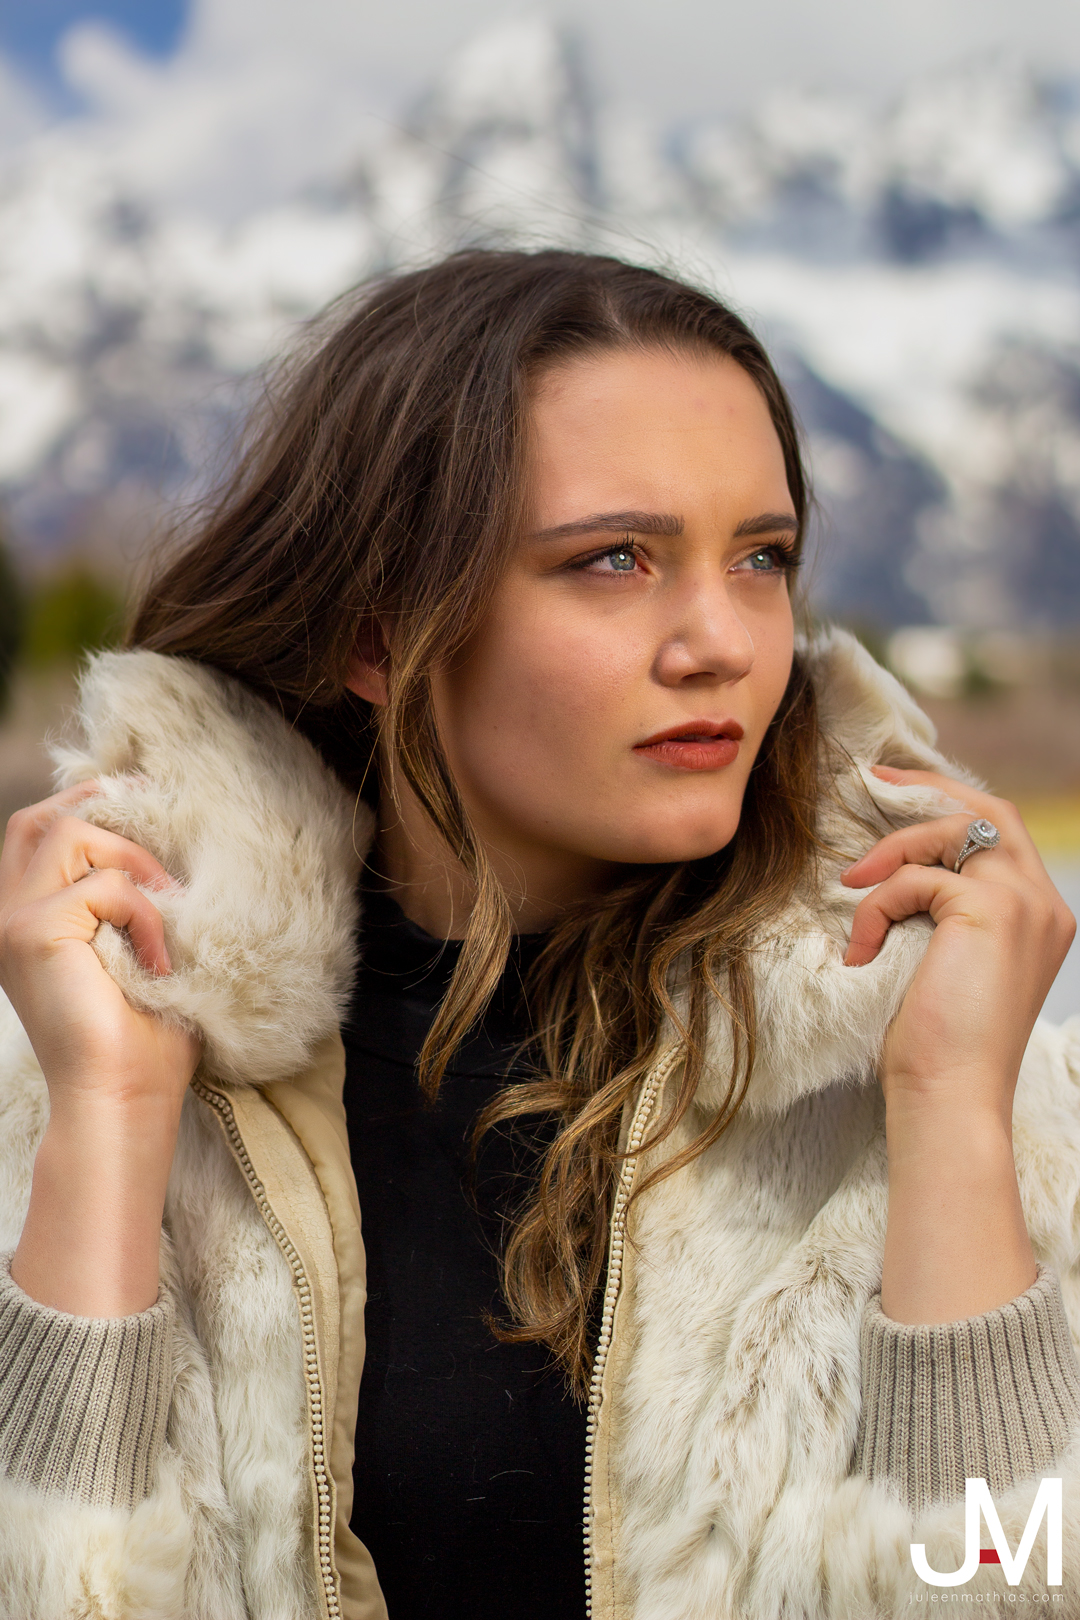
Themed Portraits
For this photo, I had my model standing in front of String Lake in Grand Teton National Park. There were two lights set up. One acted as the primary light to her left and one acted almost like a backlight to her right. My shutter speed was at 1/2000, with an aperture of f/3.5 and ISO 100.
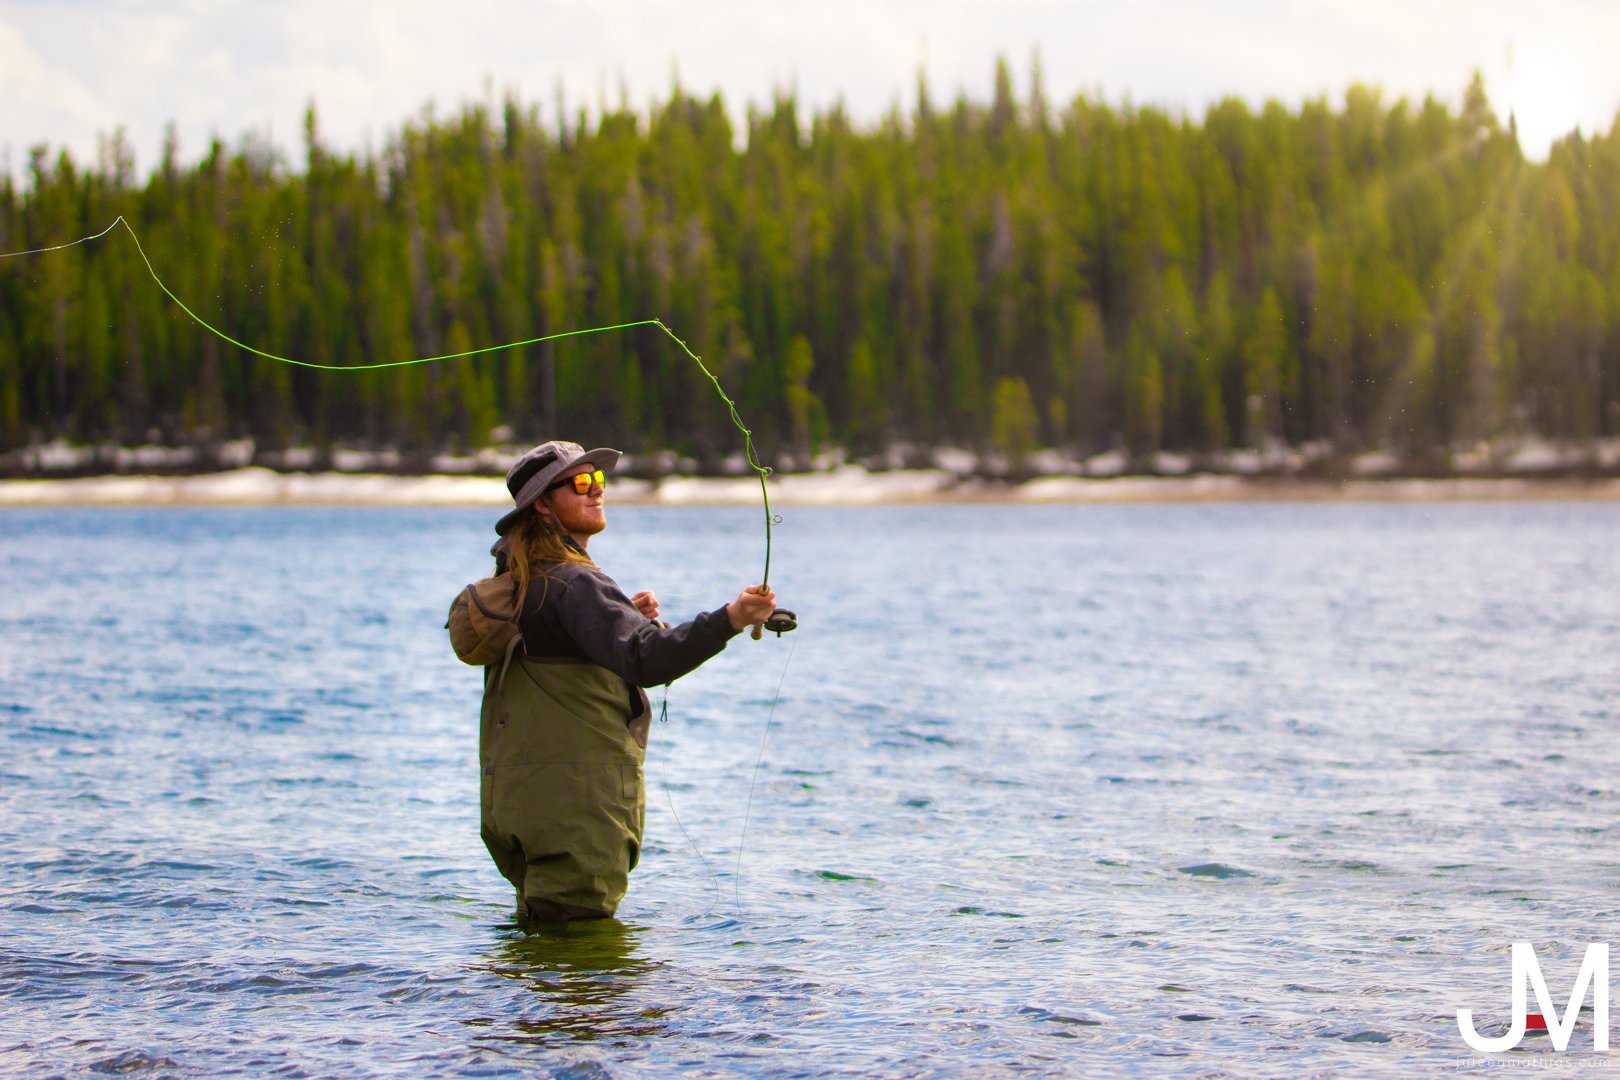
This next photo was taken of a stranger in Grand Teton National Park. I asked him if I could take some pictures of him while he was fishing. He agreed and continued doing what he was doing. I was able to capture this action portrait of him while fishing. My shutter speed was at 1/1250, with an aperture of f/5.0 and ISO 200.
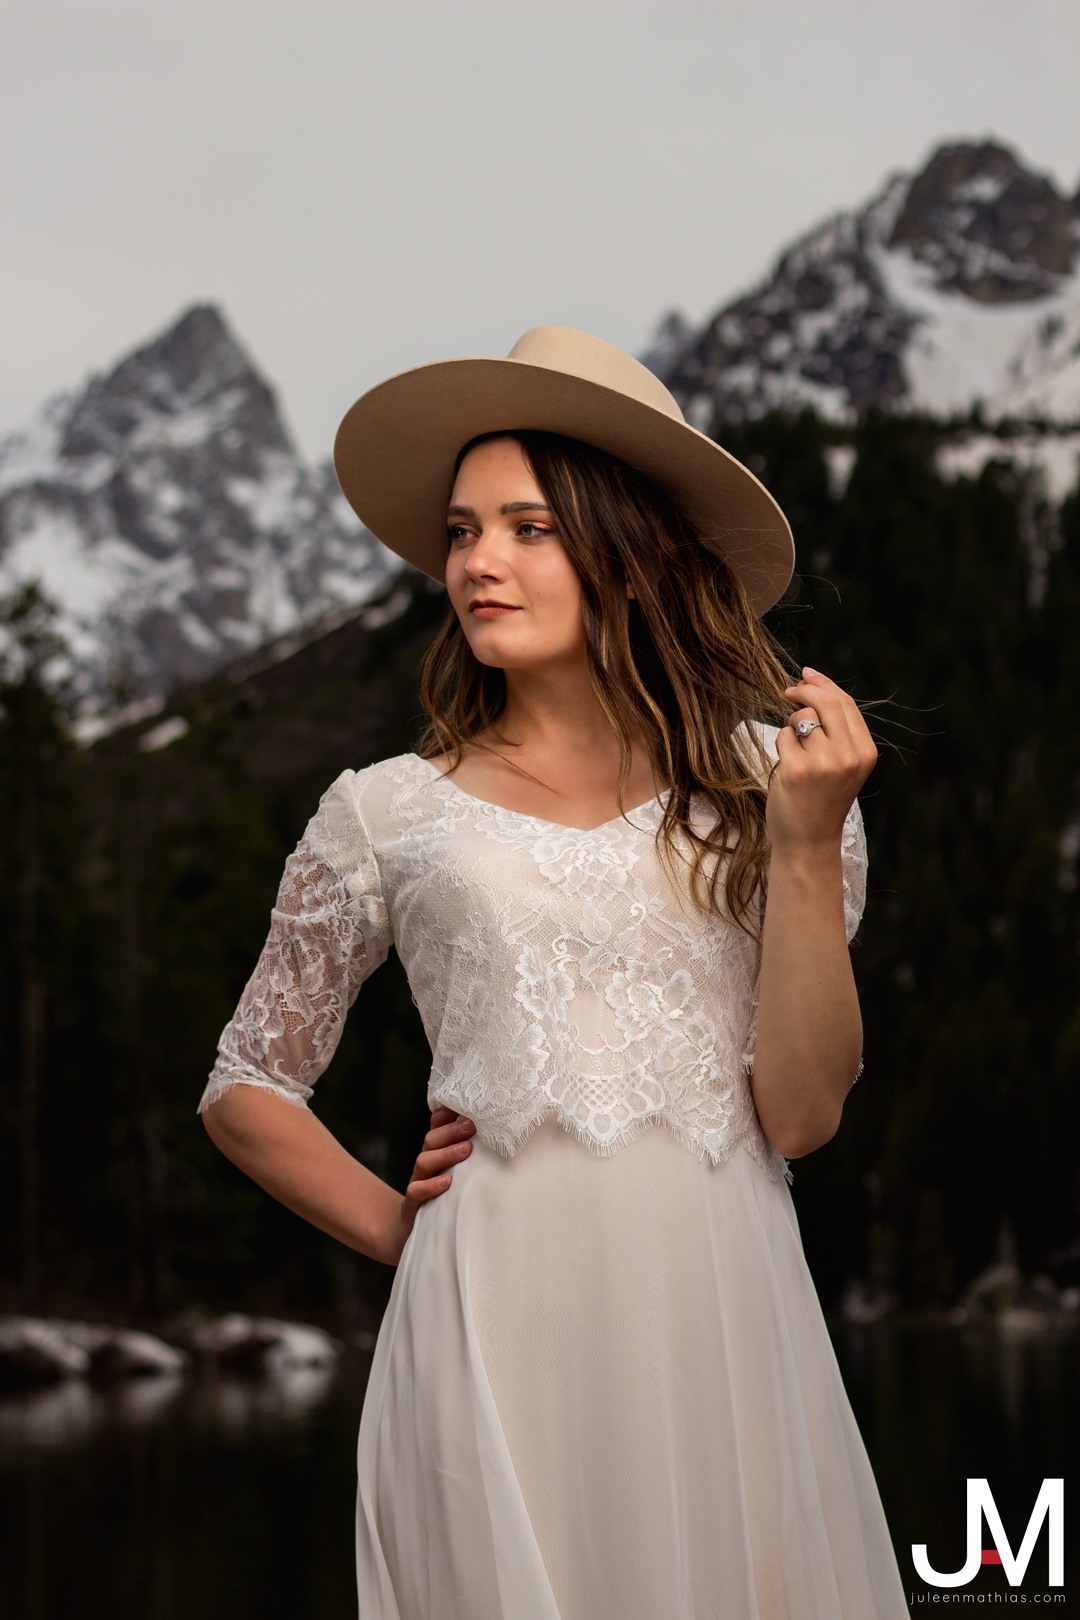
Headshots
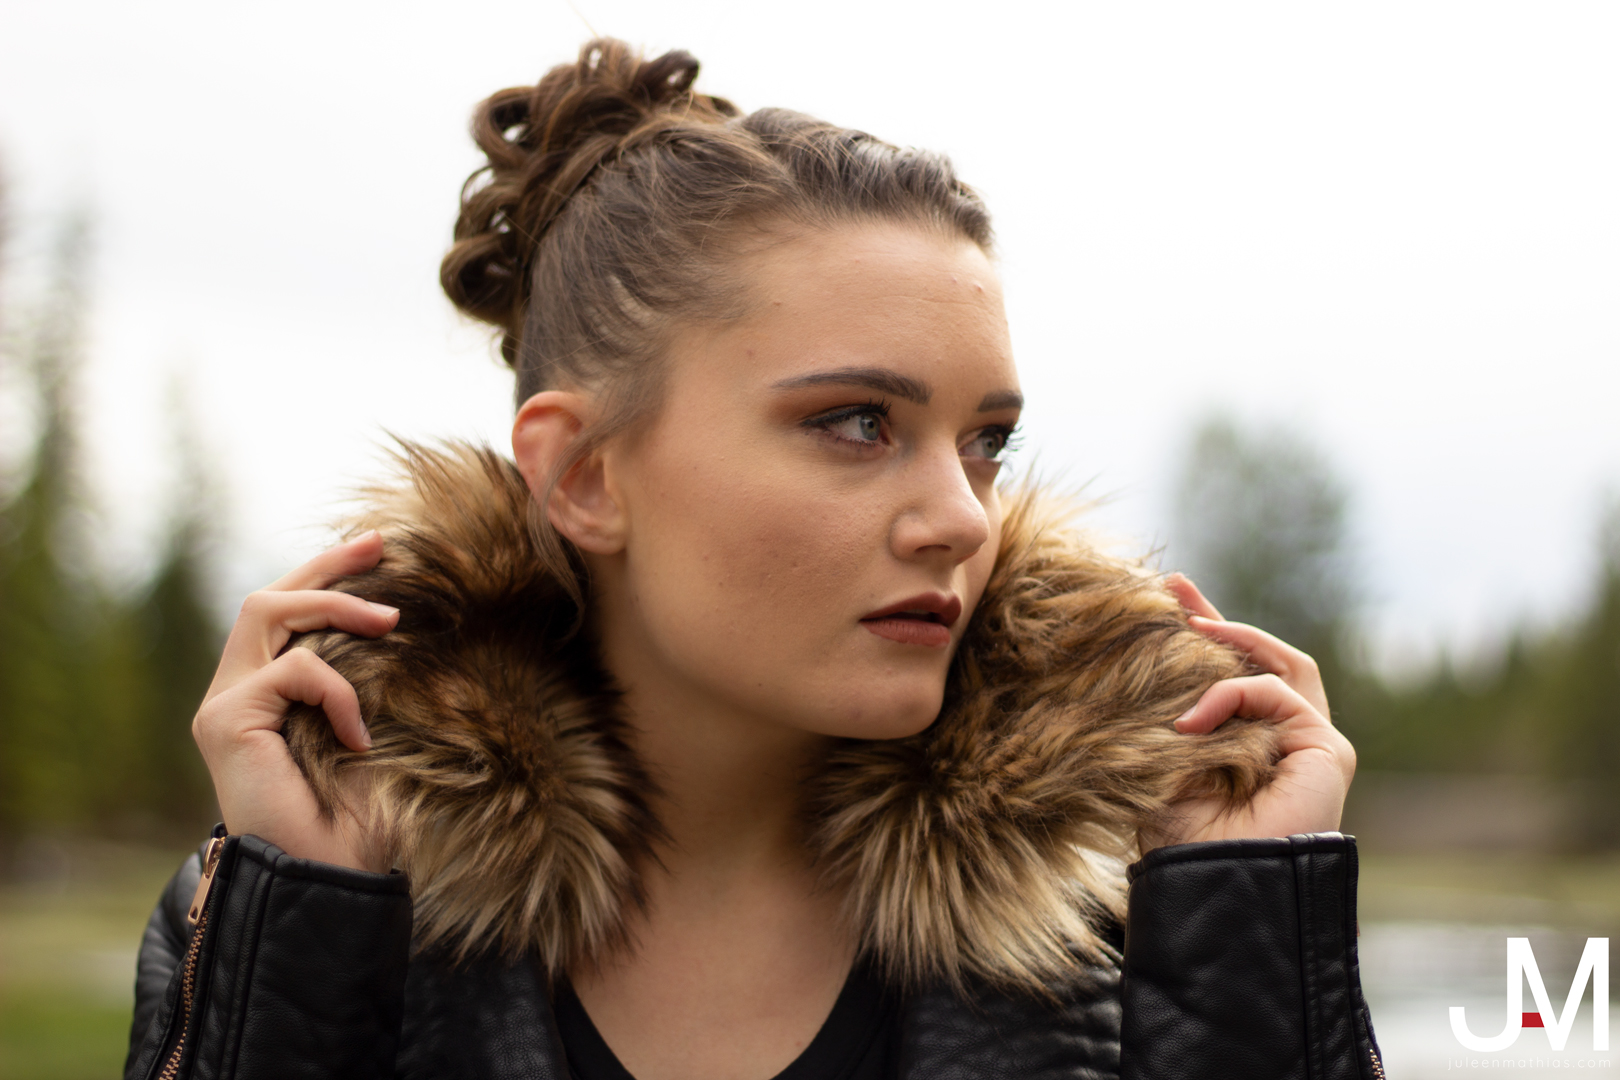
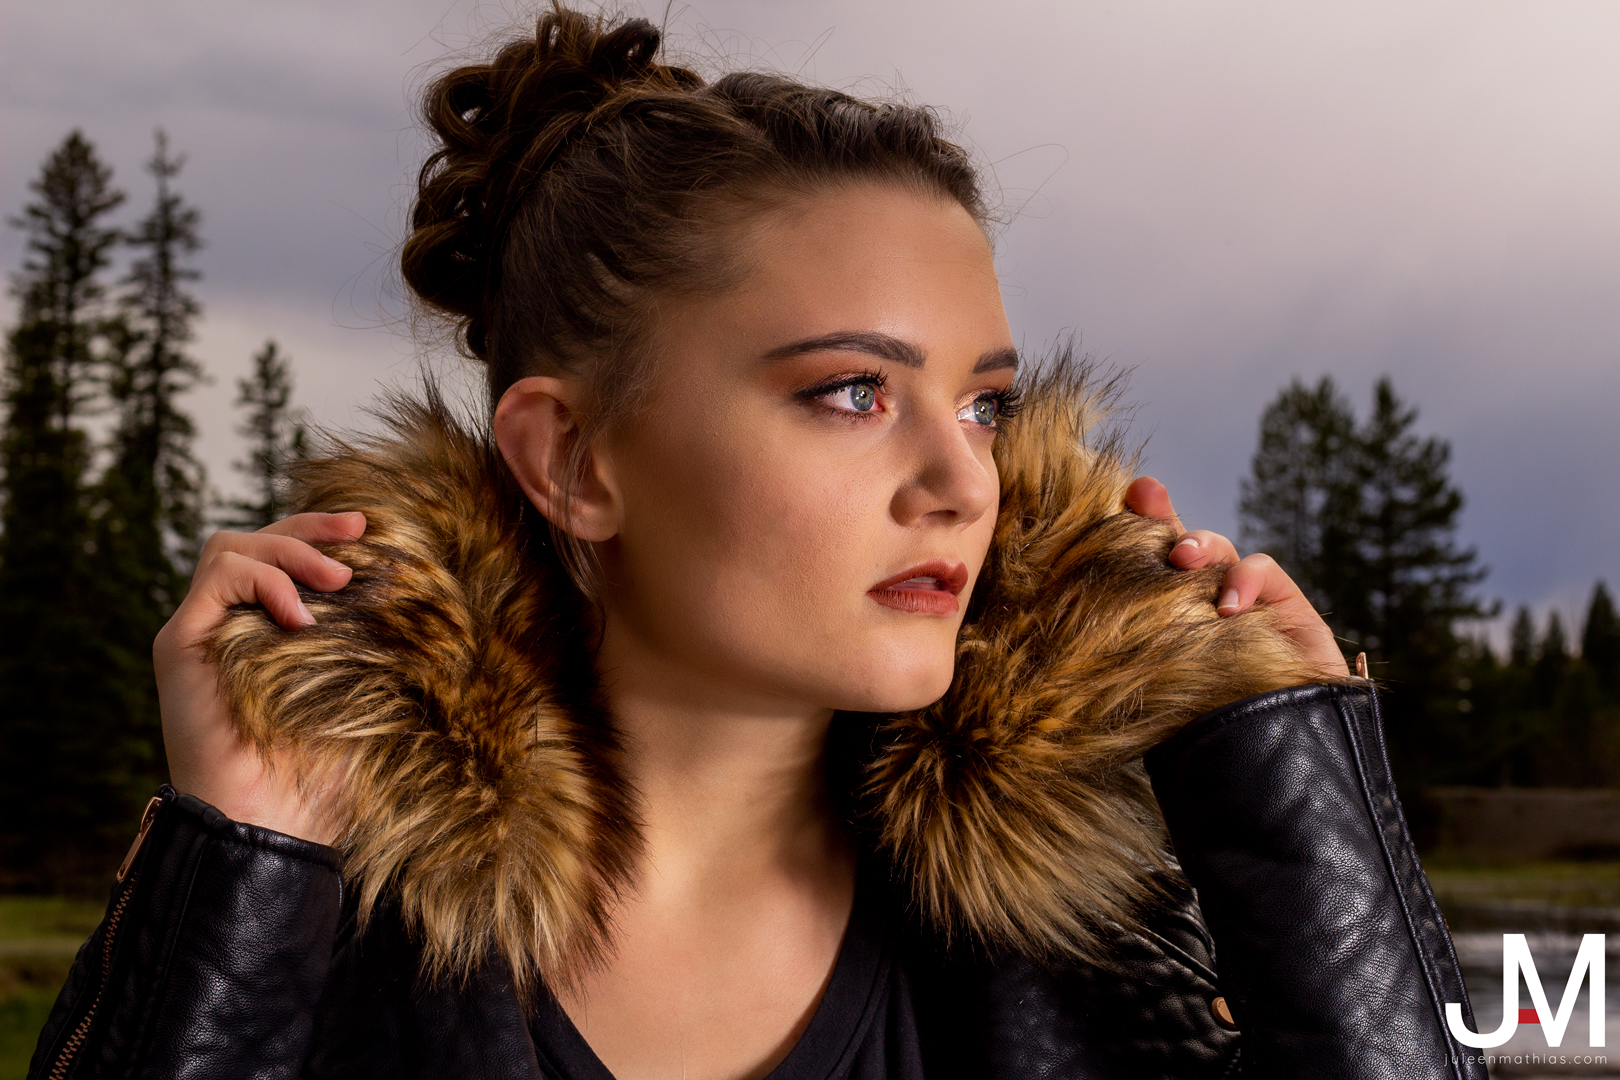
This photo was taken in front of the Tetons along the Snake River. We set up one Godox light to illuminate her face to help to not overexpose the background too much. The shutter speed was at 1/3200, with an aperture of f/2.8 and ISO 100.
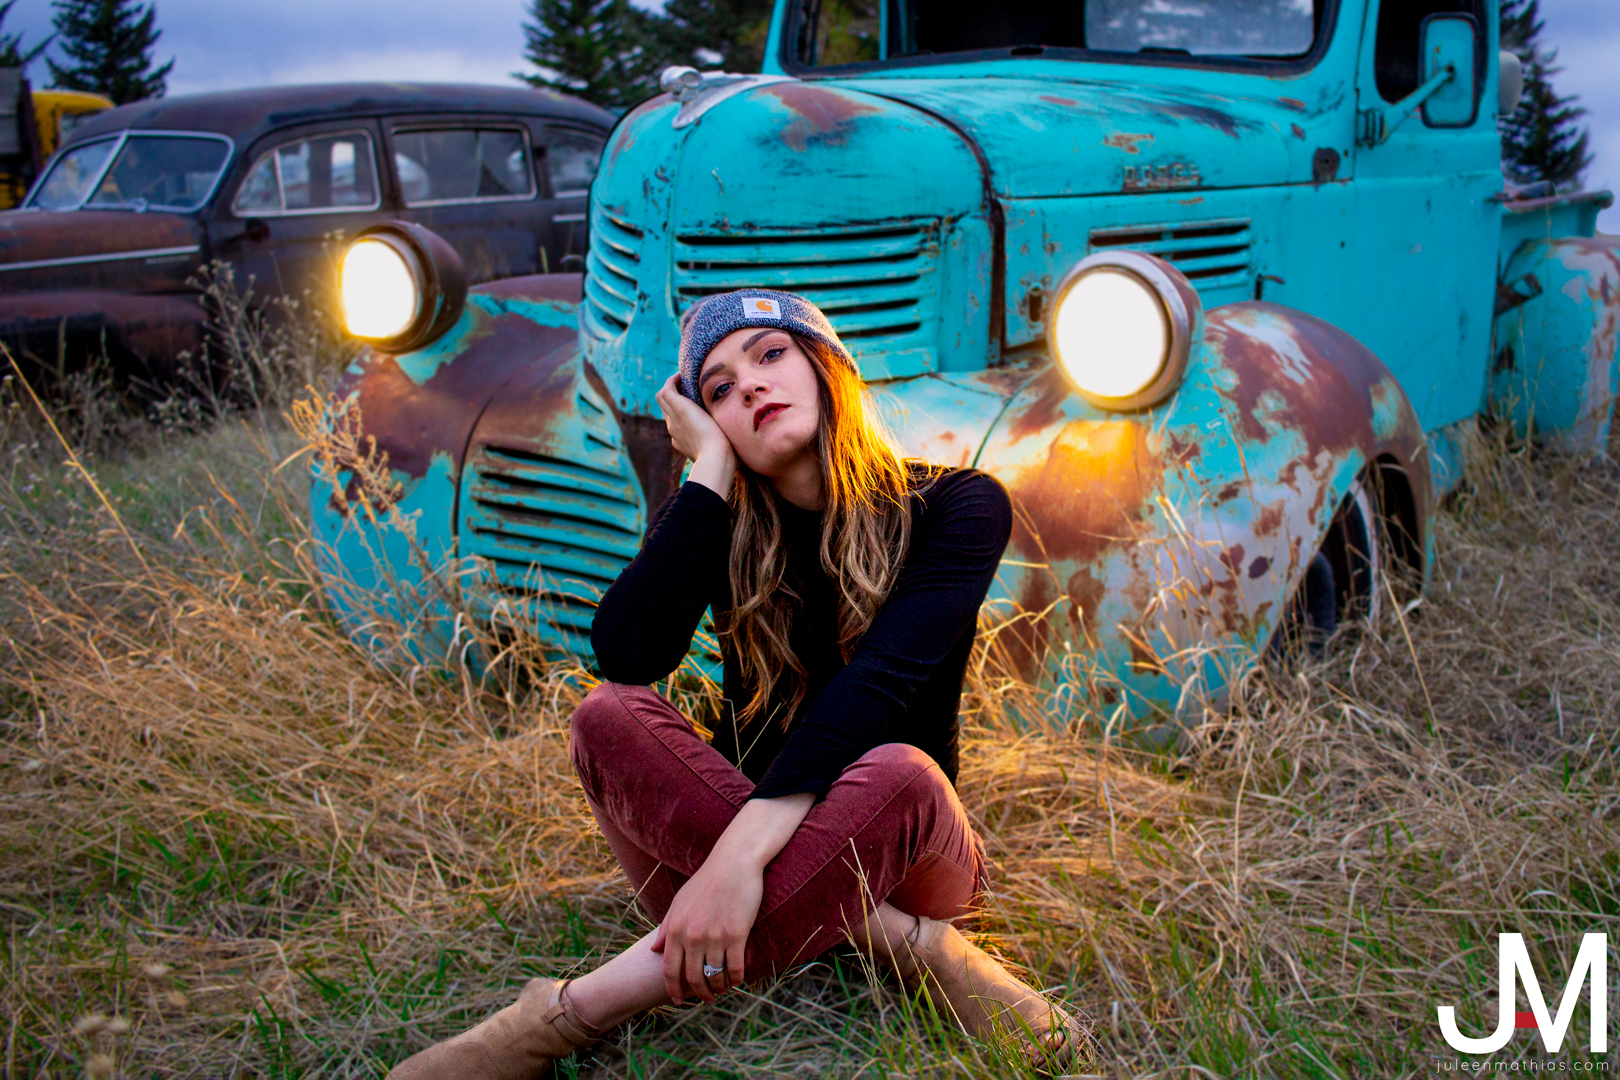
This photo was taken at an old car field in Ashton, Idaho. The model was sitting on the ground in front of the car with two LED lights stuck in the headlights. My shutter speed was at 1/160, with an aperture of f/2.8 and ISO 400.
Epic Portrait
Turning a drab portrait into an epic portrait.
Capturing an epic portrait is not as difficult as you may think. It takes three simple steps to get a spectacular shot. Some photographers, such as Meghan Nelson have displayed how simplistic it is to turn a drab photo into an epic one. You start off by taking a portrait of your subject, but with the settings to have the face well exposed, and the background overexposed. Next, you take a shot with the subject underexposed, but the perfect exposure for the background. Lastly, with the same settings used for the underexposed photo, take the same photo, but with a speedlight.
Overexposed
My shutter speed was at 1/1250, with an aperture of f/1.8 and ISO 100.
Underexposed

My shutter speed was at 1/500, with an aperture of f/10 and ISO 100.
Epic
Just as the prior image, my shutter speed was at 1/500, with an aperture of f/10 and ISO 100.
I edited the final photo a bit in Photoshop and Luminar 4 to bring out the colors and soften her skin.
Overall, this is a fairly simple project that anyone can try out. Next time you’re out taking portraits, try to capture your own epic portrait.
Yellowstone National Park
Exploring the natural wonders in Yellowstone National Park.
Yellowstone National Park has become one of the largest tourist attractions in the country. Photographers come from all around to capture the phenomenon of this park.
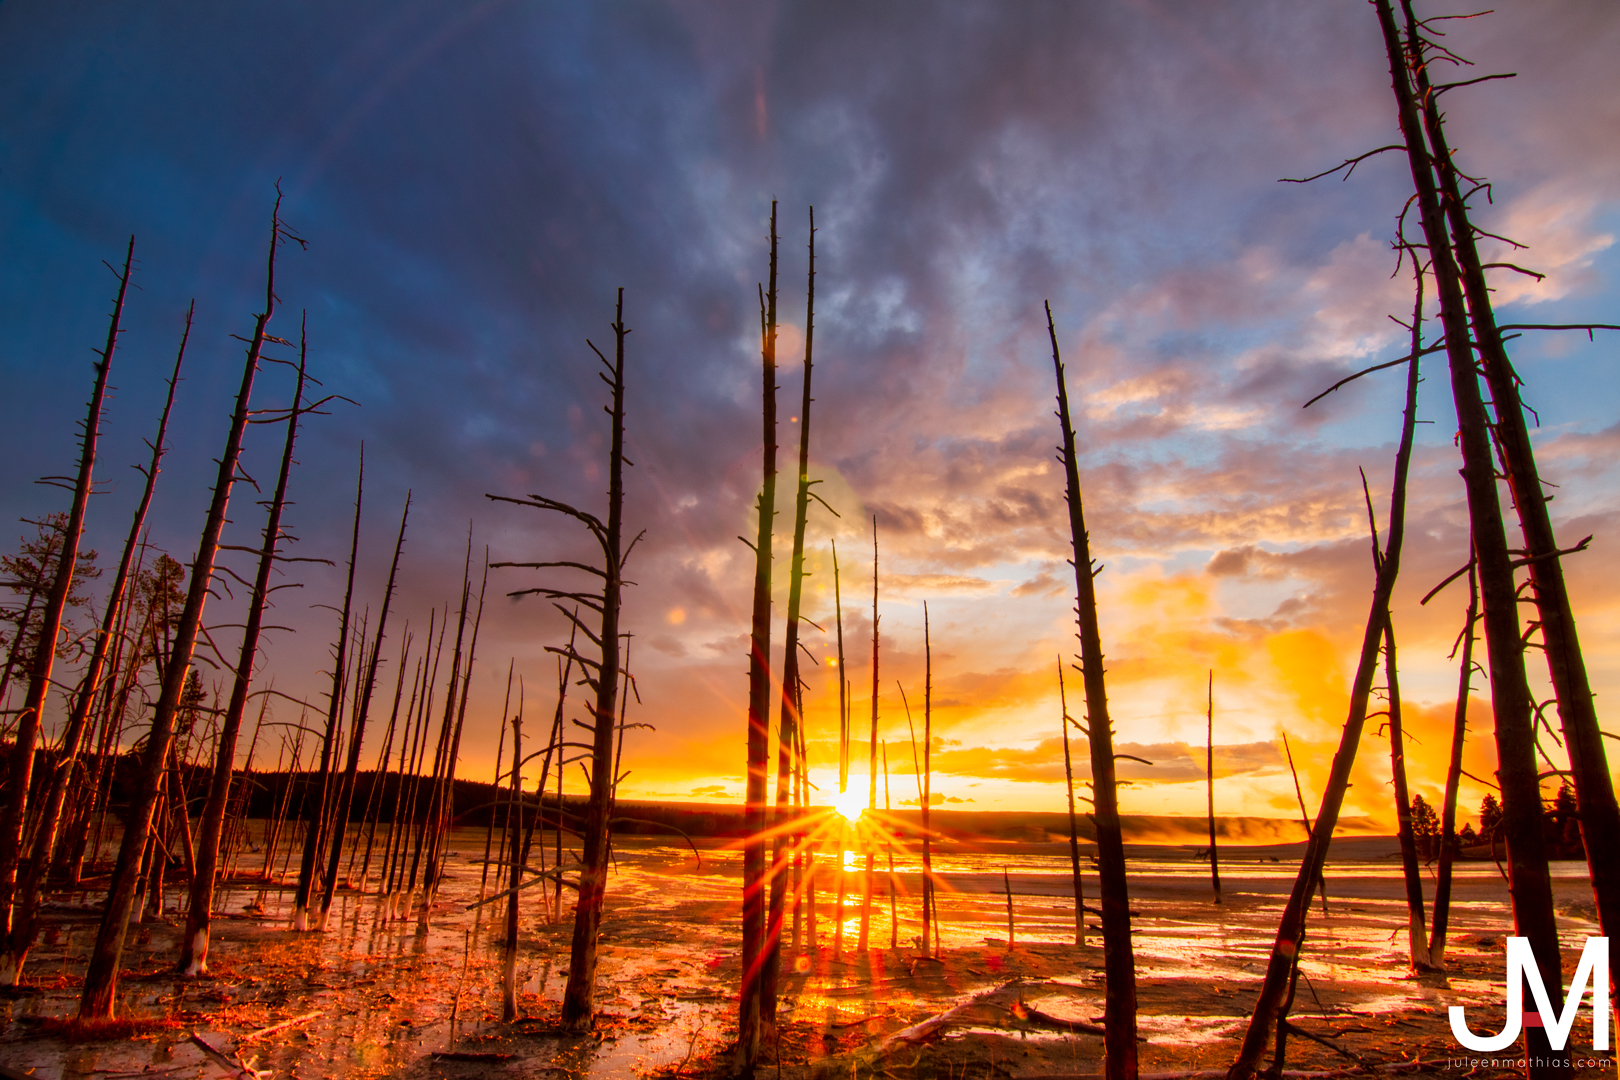
This is quite possibly one of my favorite photos I’ve ever taken. I set my camera on a tripod and lined up to capture the sun flare through the tall, skinny trees. I had my shutter speed at 0.6″, with an aperture of f/22 and ISO 100.
In post production, I merged the bracketed images and enhanced the details and colors.
This sunset was too amazing not to capture multiple angles. I wanted to capture the reflection of the trees in the water on the left while still capturing the sun flare. I lined up the solo tree to stand on the 1/3 grid line to create a beautiful balance. My shutter speed was at 0.8″, with an aperture of f/22 and ISO 100.
I really wanted to add more color to this shot, so I created a blue and purple mask to highlight in the clouds. I also merged the bracketed images in post production.
I did not do much to edit this photo, it came out almost perfect straight out of the camera. With my shutter speed at 1/25, with an aperture of f/22 and ISO 200, I was able to capture this beautiful scenery of the rushing water and bold, stormy clouds.
The only things I touched up in post were the details and colors slightly.
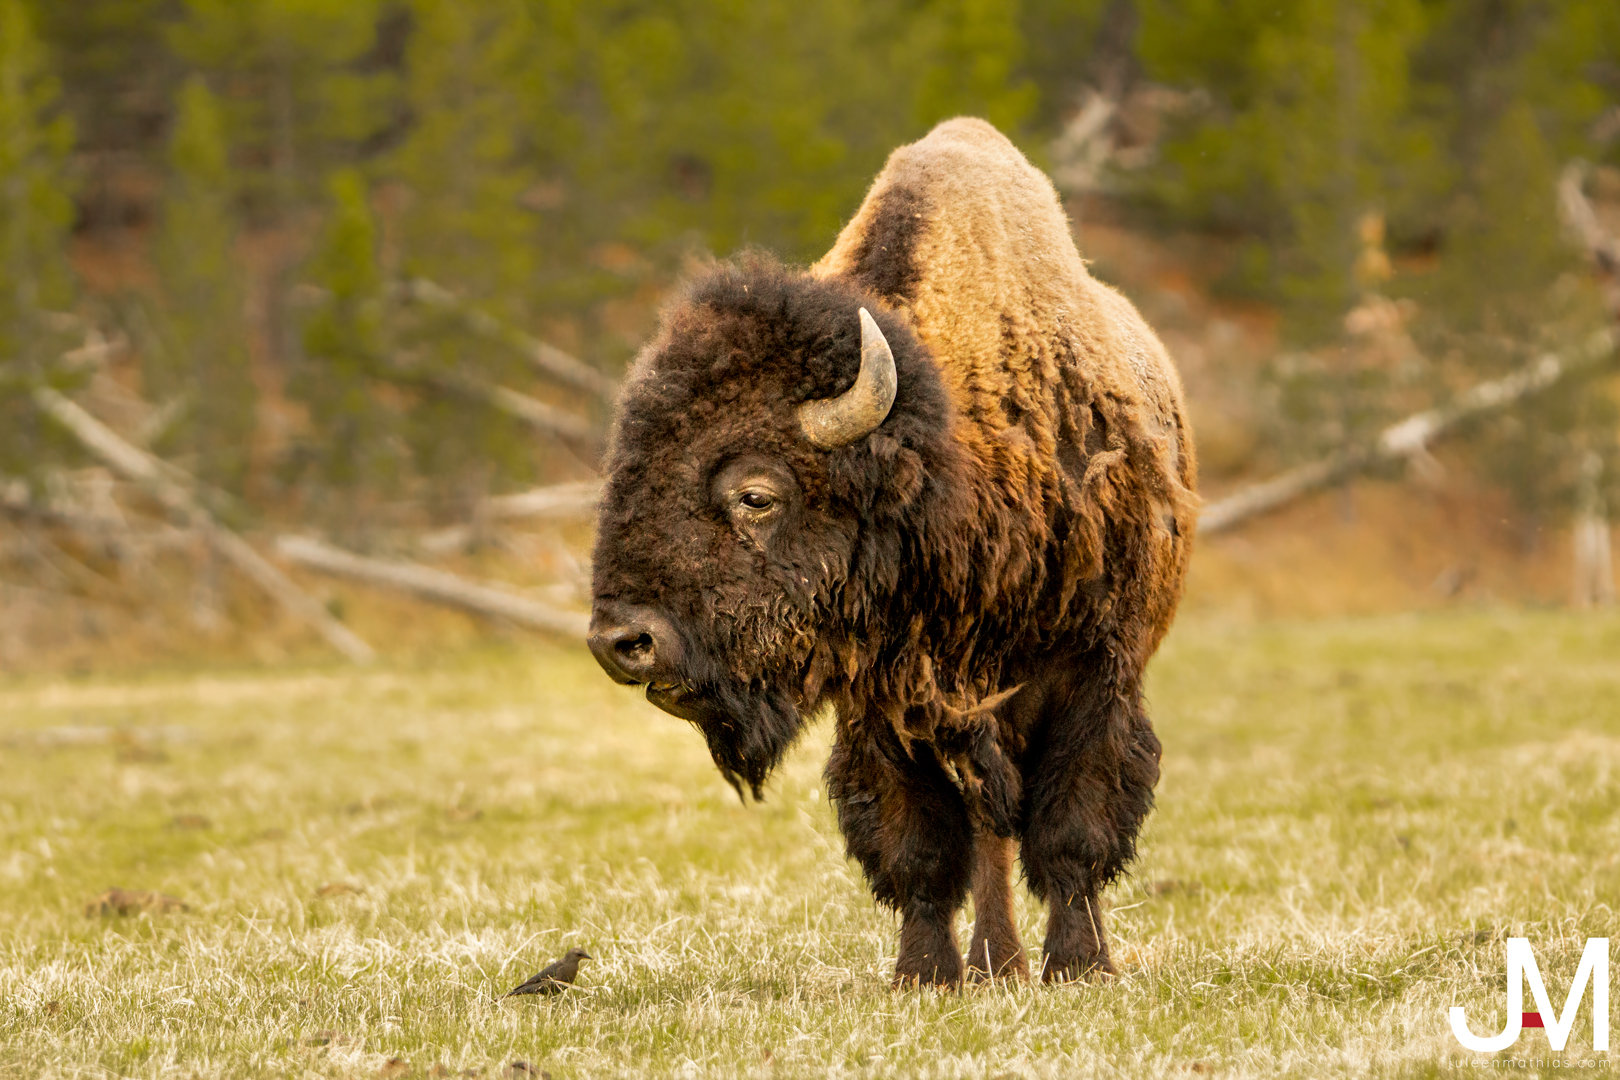
I love that I was able to capture the bird next to the bison in this composition. For this photo, I had my shutter speed at 1/1600, with an aperture of f/5.6 and ISO 1600.
In post production, I brought out the clarity in the bison’s eye. I also denoised the backgound to create the illusion of a shorter depth of field.
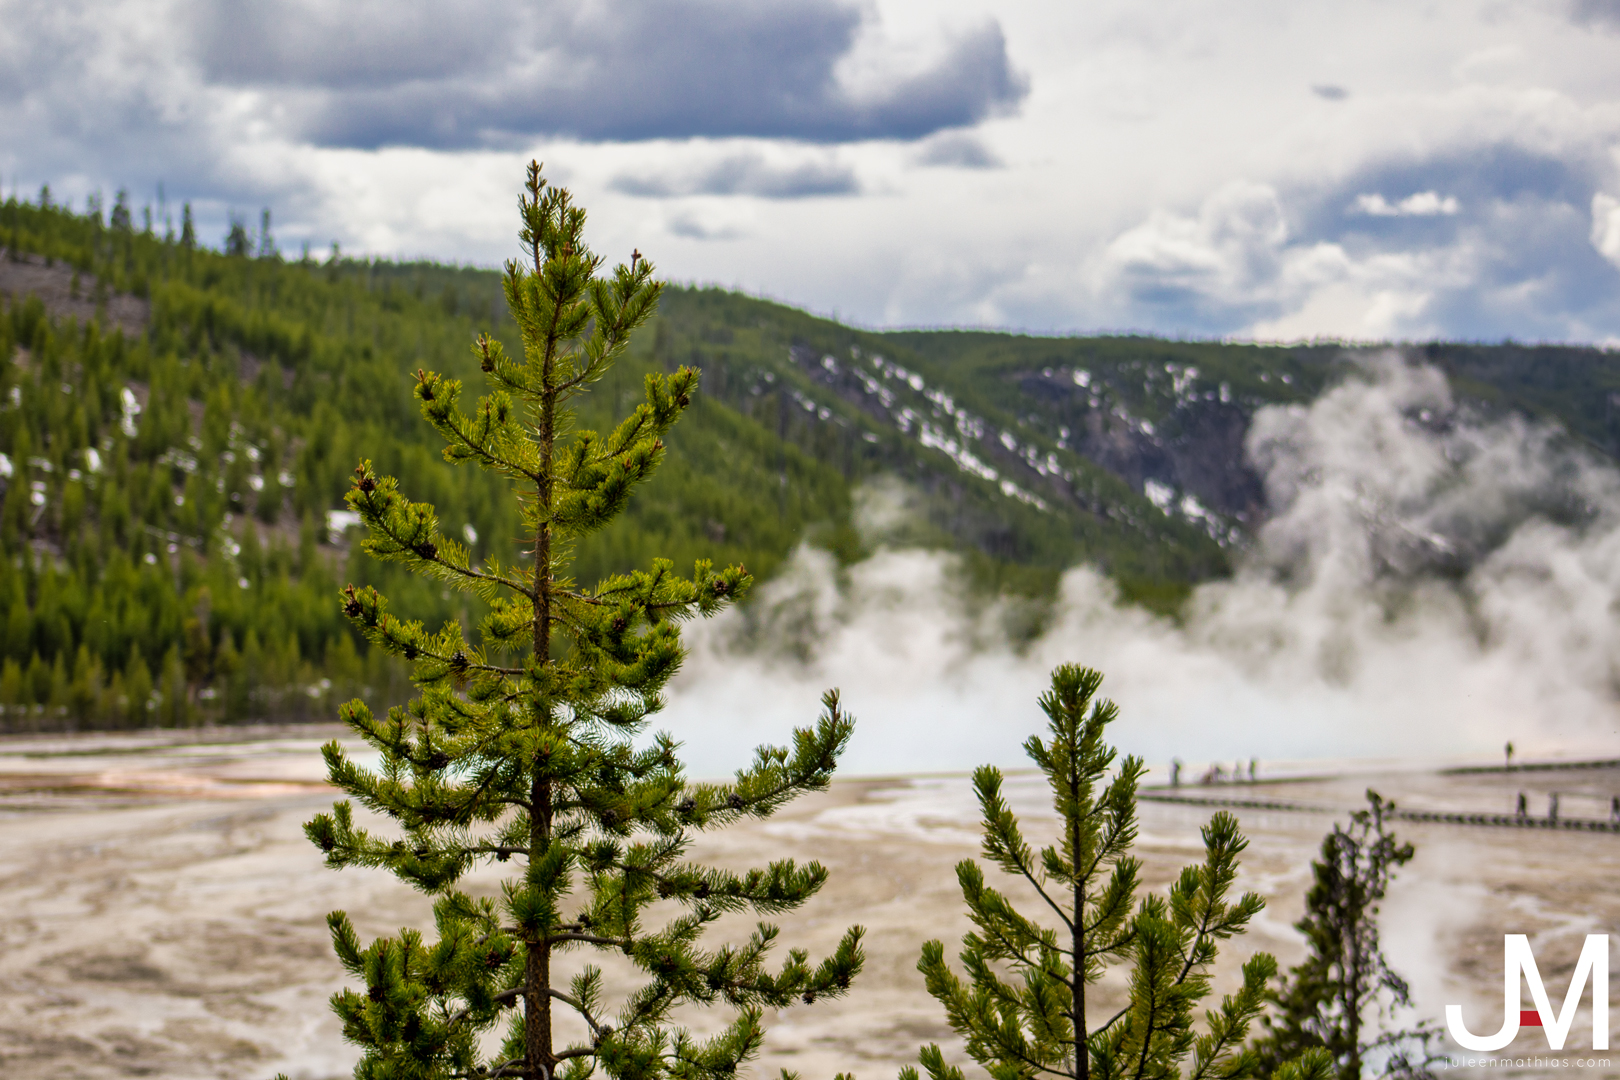
This photo was taken up the side of a mountain overlooking the Artist’s Paint Pots in Yellowstone National Park. I love how the foreground is these small-looking trees, but in reality, they are huge pine trees overlooking the park. My shutter speed was at 1/800, with an aperture of f/4 and ISO 100.
Being able to experience the world in such beauty is such a blessing. No matter the photo, nothing will beat the feeling of exploring what nature has to offer.
Buffalo River, Idaho
Landscapes and wildlife along the Buffalo River, Idaho.
Talented photographers, such as Caryn Esplin, have discovered the beautiful sights along the Buffalo River, Idaho.
This photo was taken during sunset along the Buffalo River. I had my camera on a tripod and a wide-angle lens with a moose filter. This allowed me to have a longer shutter to slow the water, while still capturing the surroundings. My shutter speed was at 2.5″, with an aperture of f/22 and ISO 100.
In post production, I replaced the sky since the original photo was very washed out and overcast. I also sharpened the structures and enhanced the colors.
This photo was taken right outside of the Riverfront Retreat in Island Park. I waited for just the right moment as the sun flare was shining through the trees. My shutter speed was at 1/500, with an aperture of f/22 and ISO 3200.
I didn’t realize how high my ISO was in the moment, so a lot of the post production was fixing the grain. I merged the three bracketed images and enhanced the colors.
This is another photo taken in the backyard of the Riverfront Retreat in Island Park. I took this during blue hour to capture the crystal clear, slow-moving water. I love that the slower shutter allowed me to capture the bottom of the river as well. My shutter speed was at 20″, with an aperture of f/11 and ISO 100.
The post production including merging the bracketed images and then dodging and burning the shadows and highlights (especially in the water).

This photo was taken in Island Park, close to the Buffalo River. This moose was walking around in an open area surrounded by trees. I had my 75-300mm telephoto lens on my camera and sat in between some trees. Soon after I took this photo, the moose noticed me and started walking towards me, so this was the last photo I got before leaving the area. My shutter speed was at 1/250, with an aperture of f/5.6 and ISO 6400.
In post production, I used content-aware in the crop tool to pull back from the moose a bit since it was too tight. I also softened the trees in the background to try and create the illusion of a shorter depth of field.
Grand Teton National Park
Capturing the breathtaking sights at Grand Teton National Park.
Grand Teton National Park is one of the most outstanding national parks. With its roaring mountains and tranquil trails, it would be a shame to skip over.
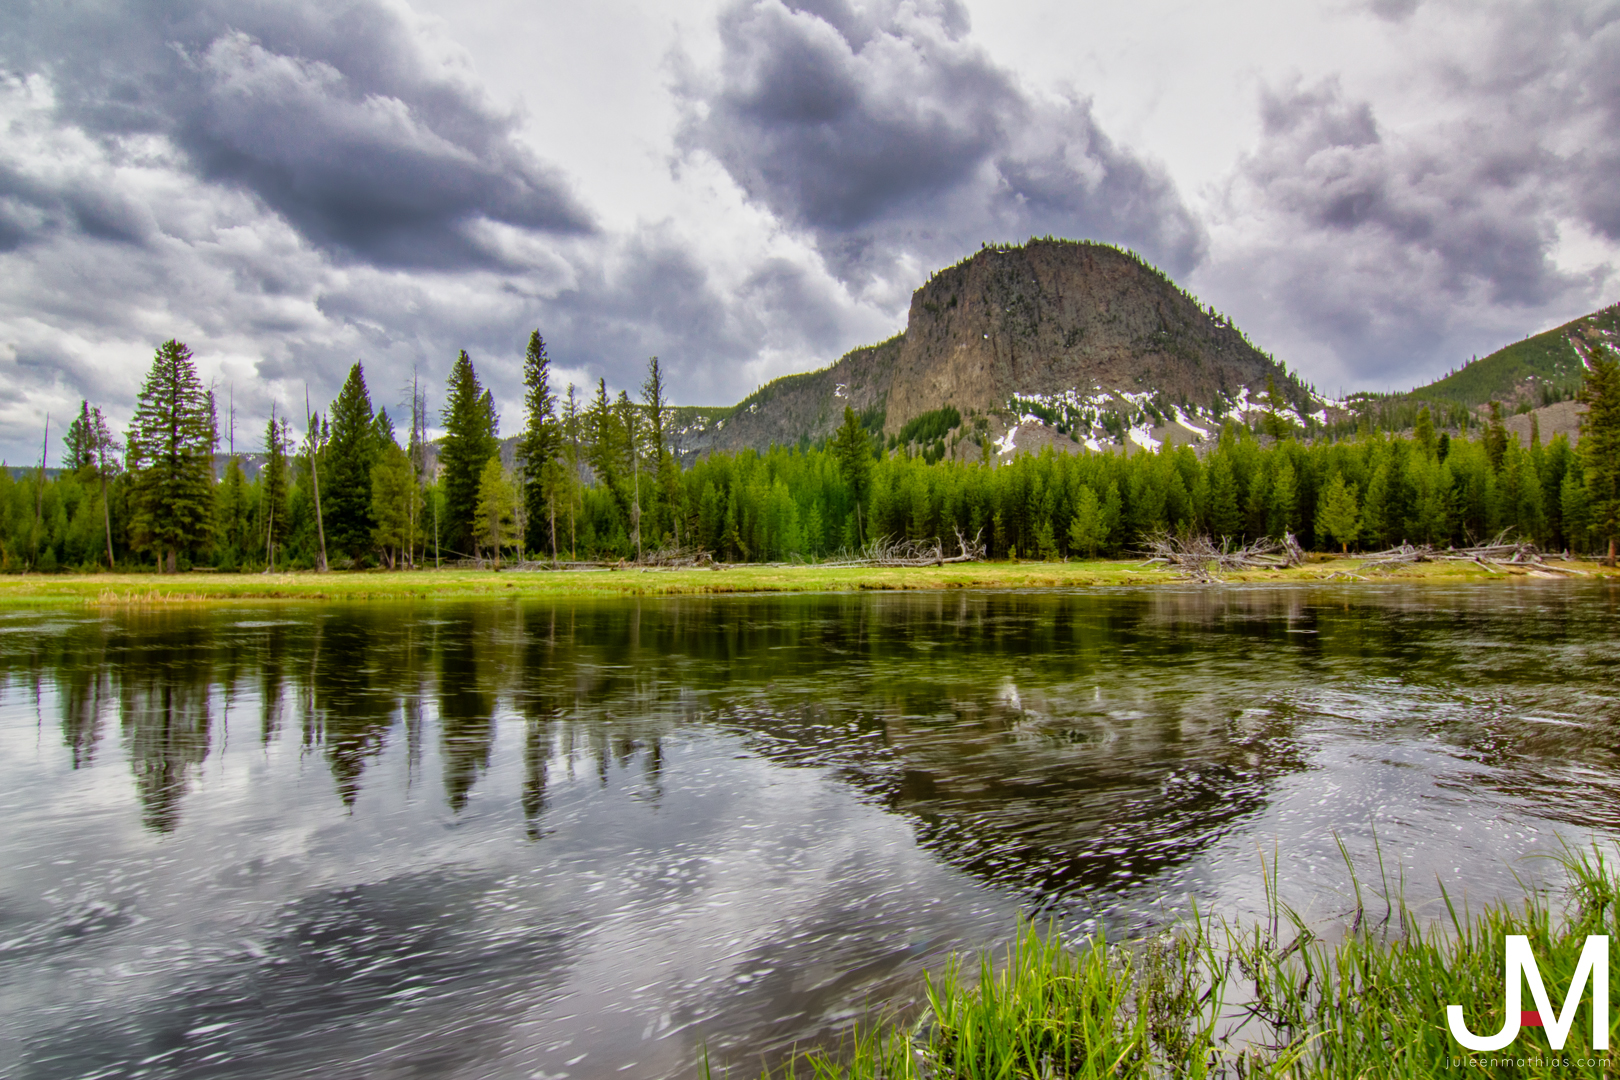
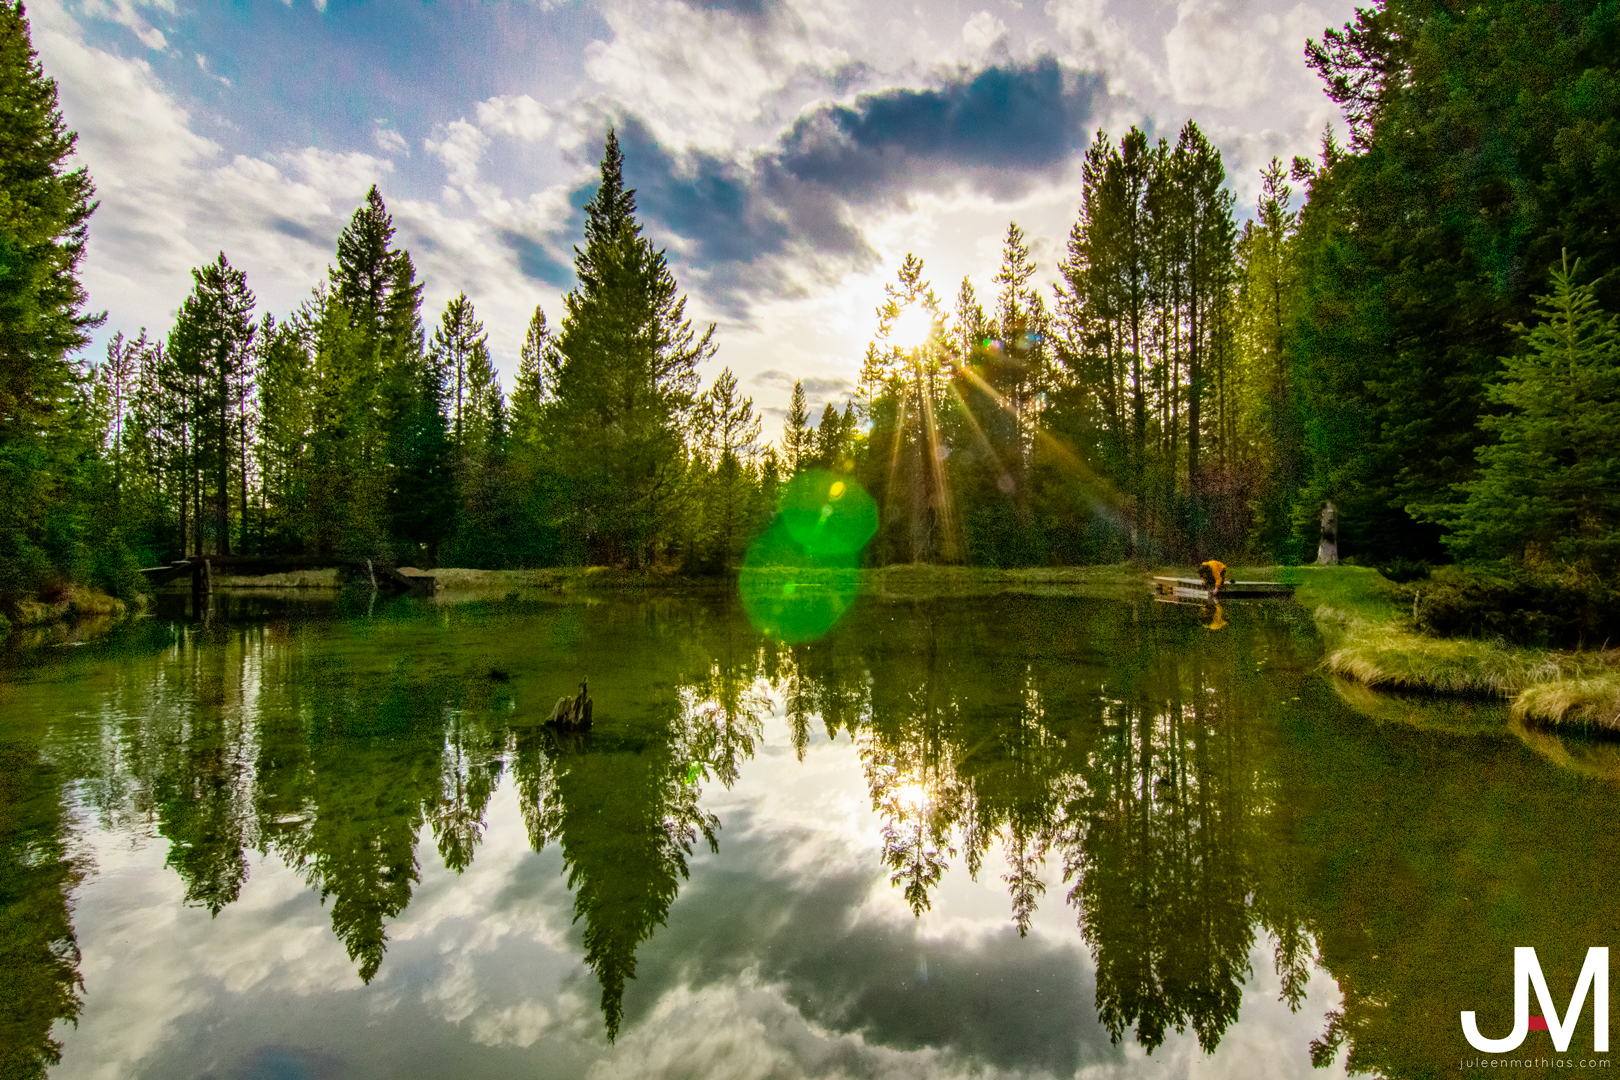
One of the greatest parts about this national park is the hidden lakes all over. Some lakes, such as String Lake, do not get the attention they deserve. While taking this photo, I loved the scenery, but I hated the atmosphere. I put my camera on a tripod and snapped a few bracketed images. My shutter speed for this photo was 1/10, with an aperture of f/22 and ISO 100. Although, this photo’s greatness is all thanks to post production.


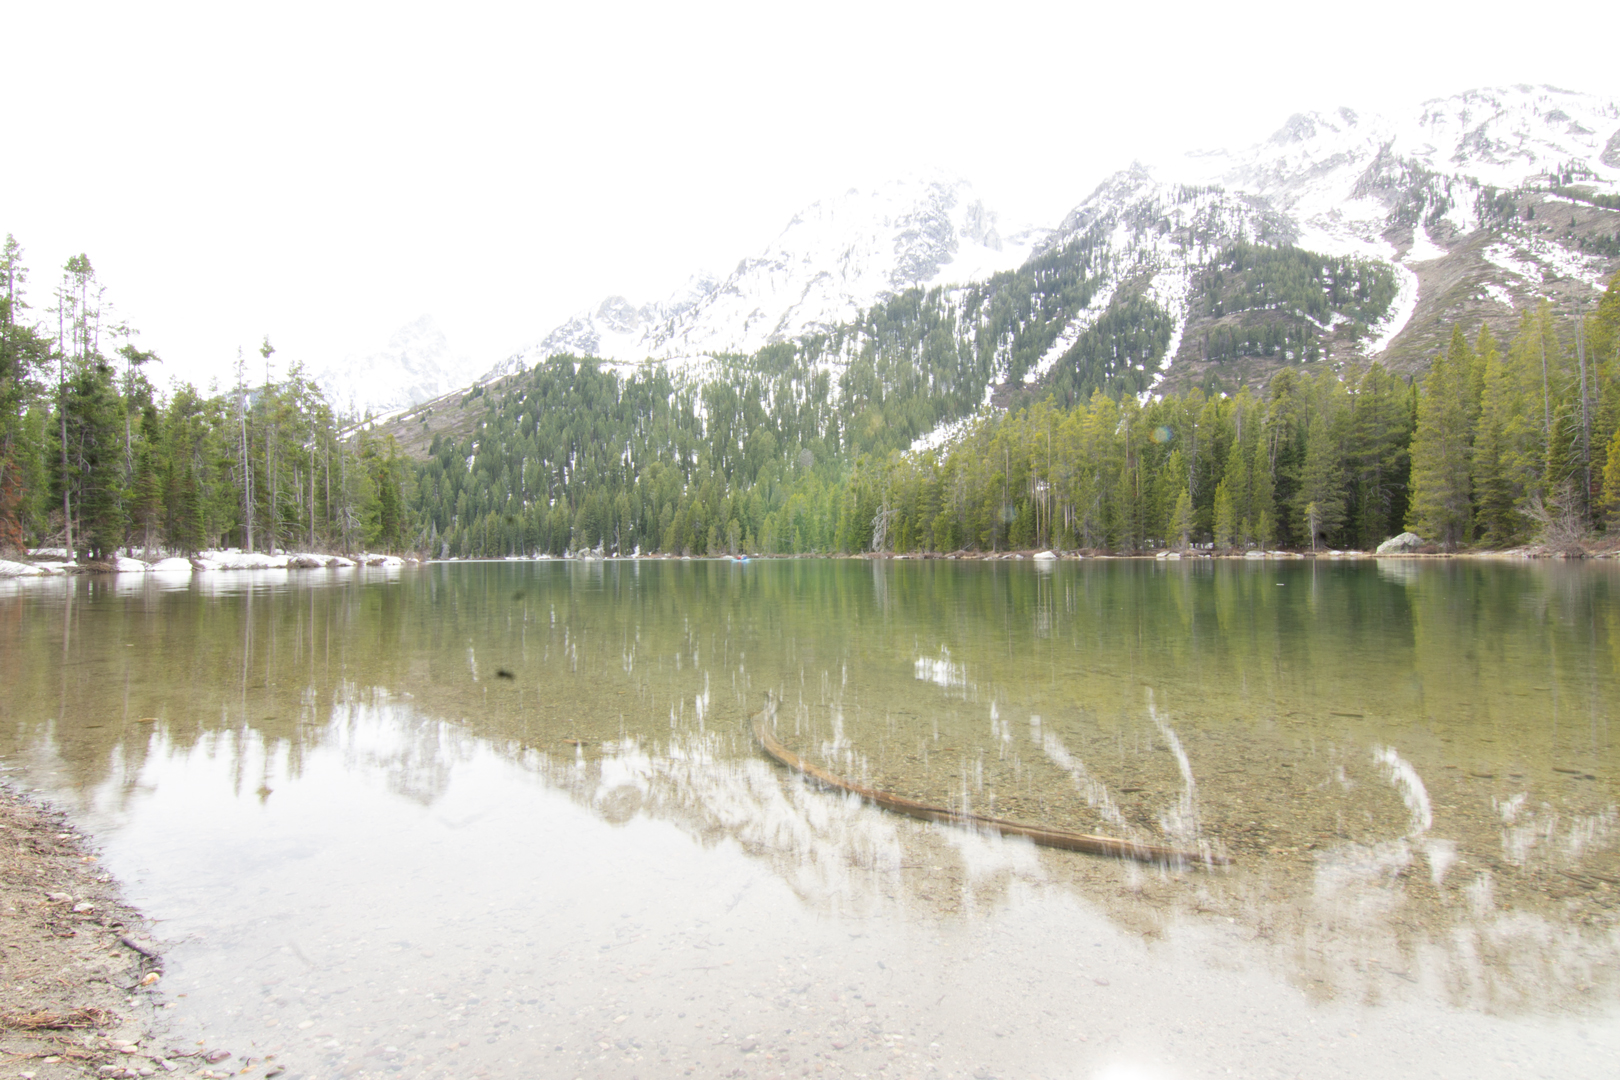
As you can see, my initial bracketed images were very dull and overcast. I merged the bracketed images and brought them into Luminar 4 to replace the sky. Since it was a hazy day, I had to mask out where the sky was so it didn’t replace the mountains. I also added a sun glare between two of the mountains. To make sure the sky and sun reflected nicely in the water, I flipped the photo and added a low opacity mask to the water.

This photo was taken along the Snake River outside of Grand Teton National Park. I held very still as I bracketed a few images together. My shutter speed was at 1/125, with an aperture of f/22 and ISO 100.
In post production, I enhanced the saturation in the blues and greens to add more color to the composition.

This photo was also taken along the Snake River. I put my camera on a tripod for this one and did some bracketed images. My initial shutter speed was at 1/30, with an aperture of f/22 and ISO 100.
In post production, I enhanced the saturate of the blues and greens. I also created a mask only on the mountain to darken it to create some contrast between the cloud behind it.

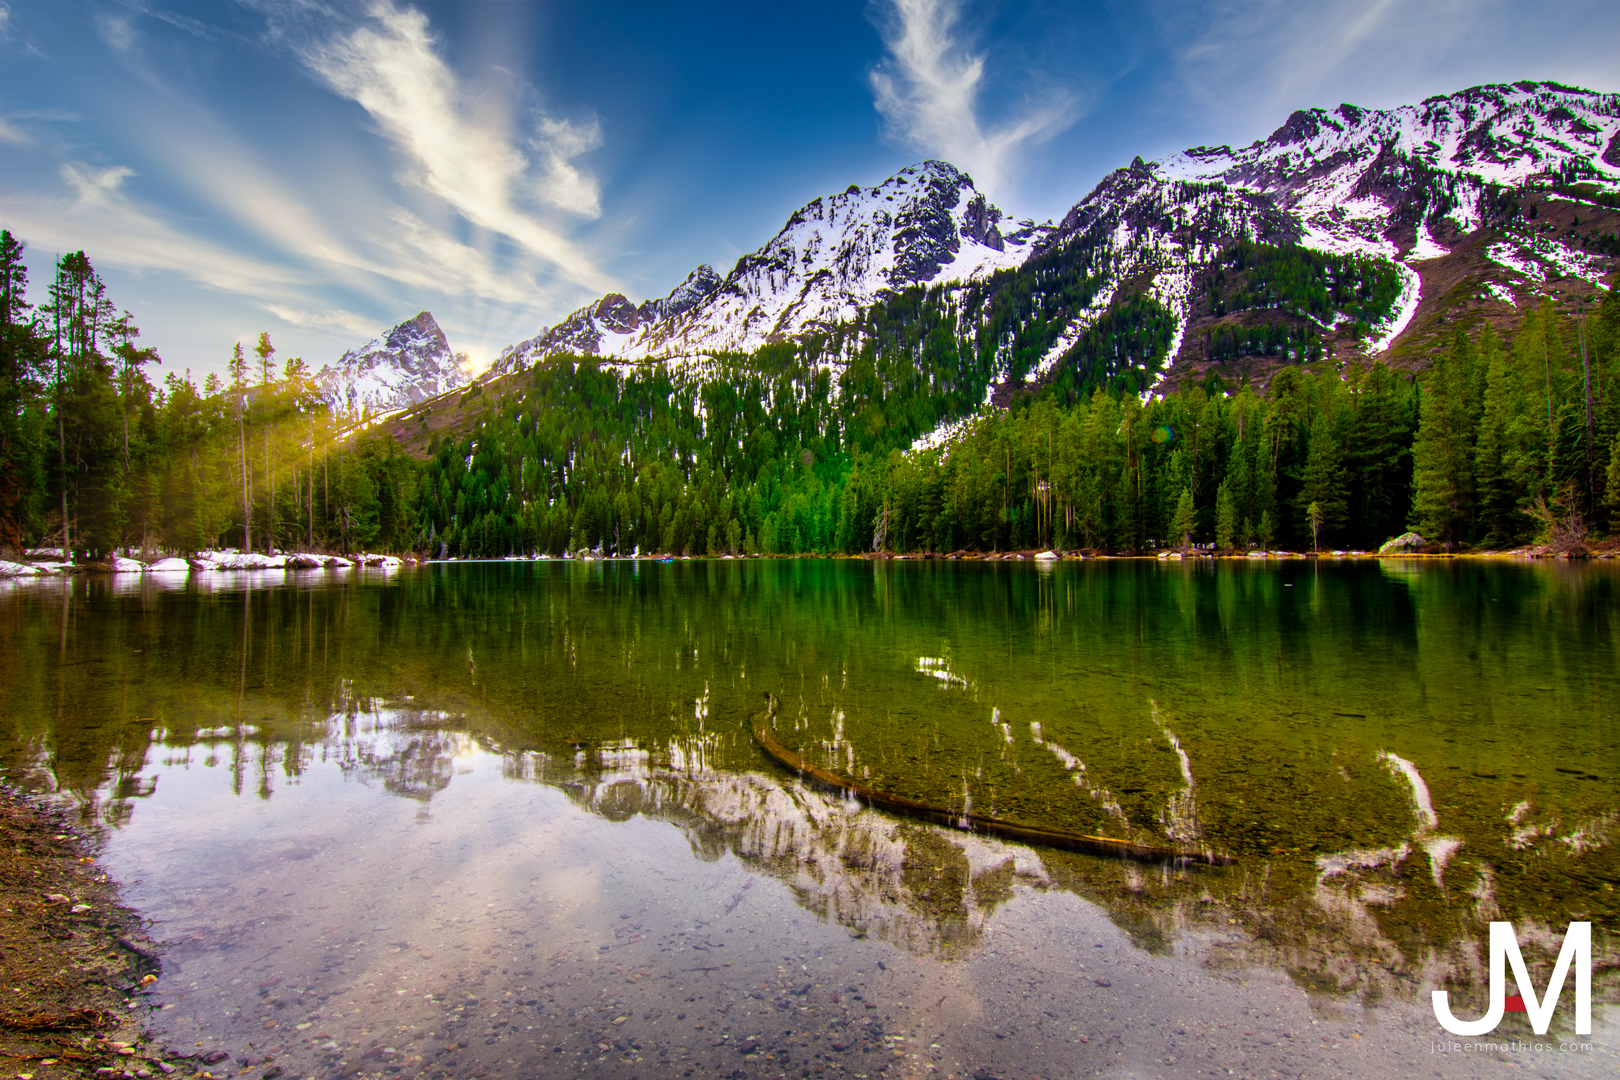
This last photo was taken at Jenny Lake. My shutter speed was at 1/125, with an aperture of f/22 and ISO 100.
I loved the look of the water on the rocks so I enhanced the oranges and yellows to give a contrast between the bright blue sky.
Throughout this day trip to Grand Teton National Park, I have discovered a whole new love for this beautiful landscape. Now that I have found some of my favorite spots, I can’t wait to go back.
Long Exposure Photography
Enhancing the art through long exposure photography.
Long exposure photography is a great way to capture breathtaking landscapes. As Canon mentions, it is taking a photo with a shutter speed anywhere from between a few seconds to a few hours.
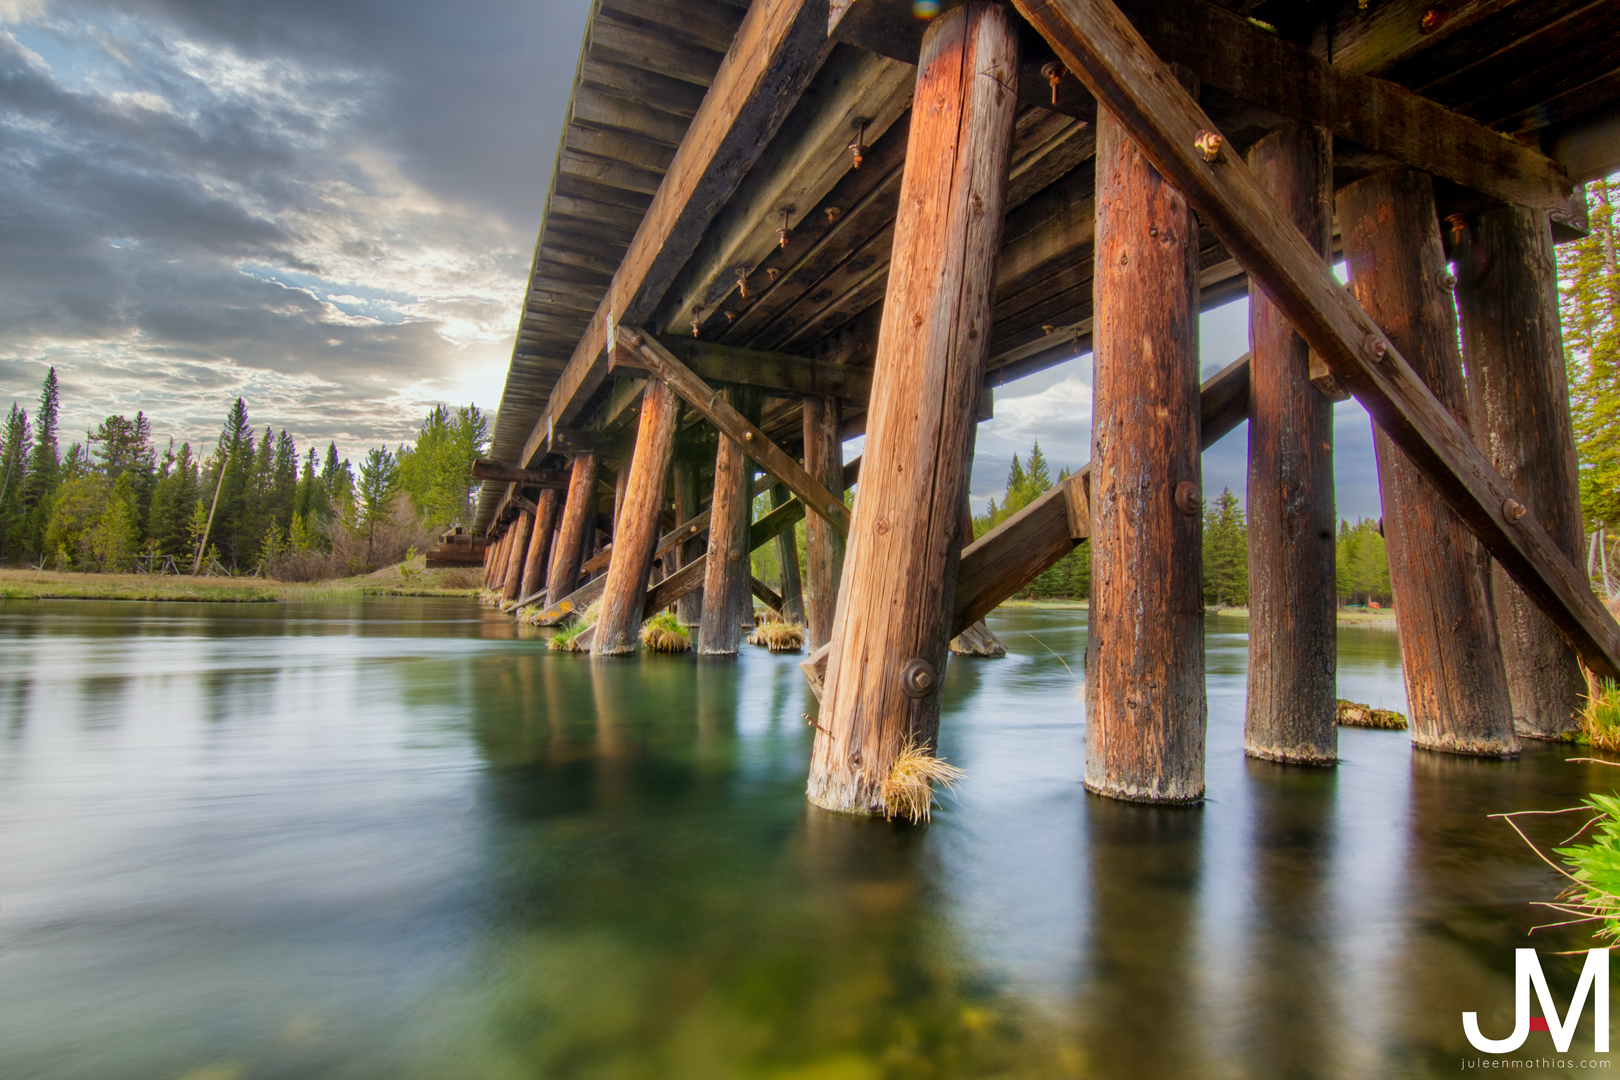
Under the Bridge
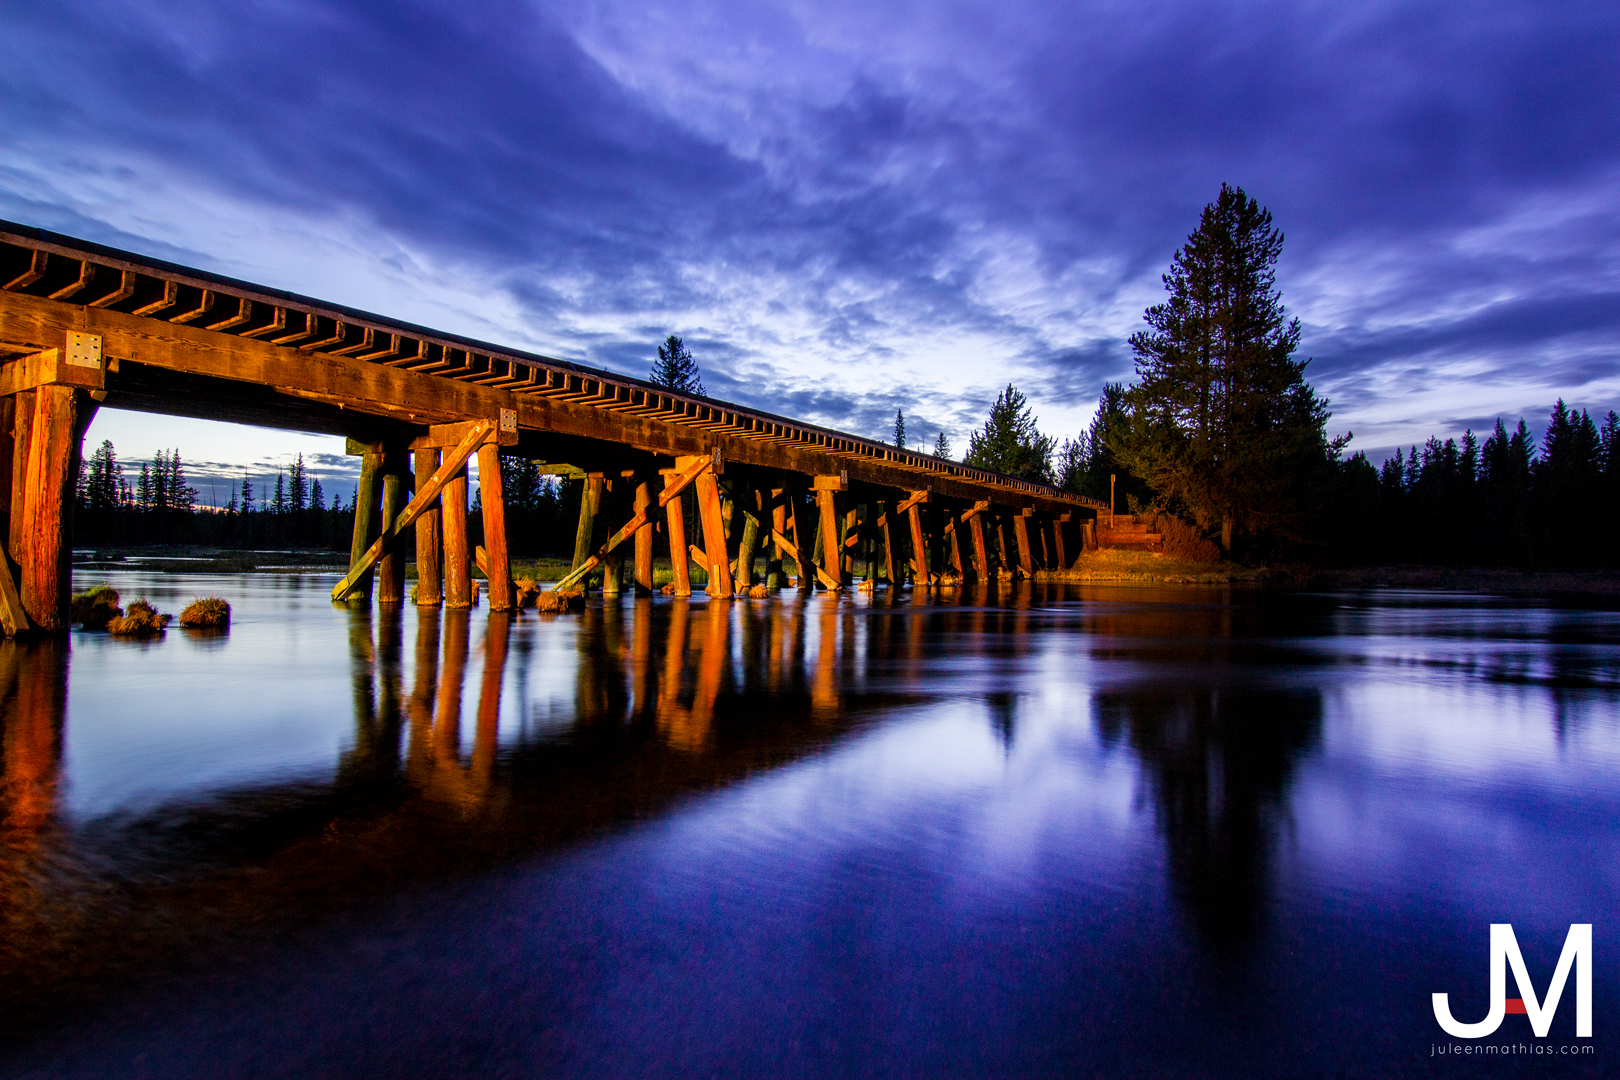
I took this photo right after blue hour. Blue hour is the time right after the sun has set. It creates a beautiful blue and purple scene. To create the warm glow on the bridge, a yellow light was shined from underneath the bridge. My shutter speed was at 8 seconds, with an aperture of f/8 and ISO 400.
In post production, I dodged and burned to create darker shadows and brighter highlights, especially in the smooth water. I also enhanced the colors.
Starburst
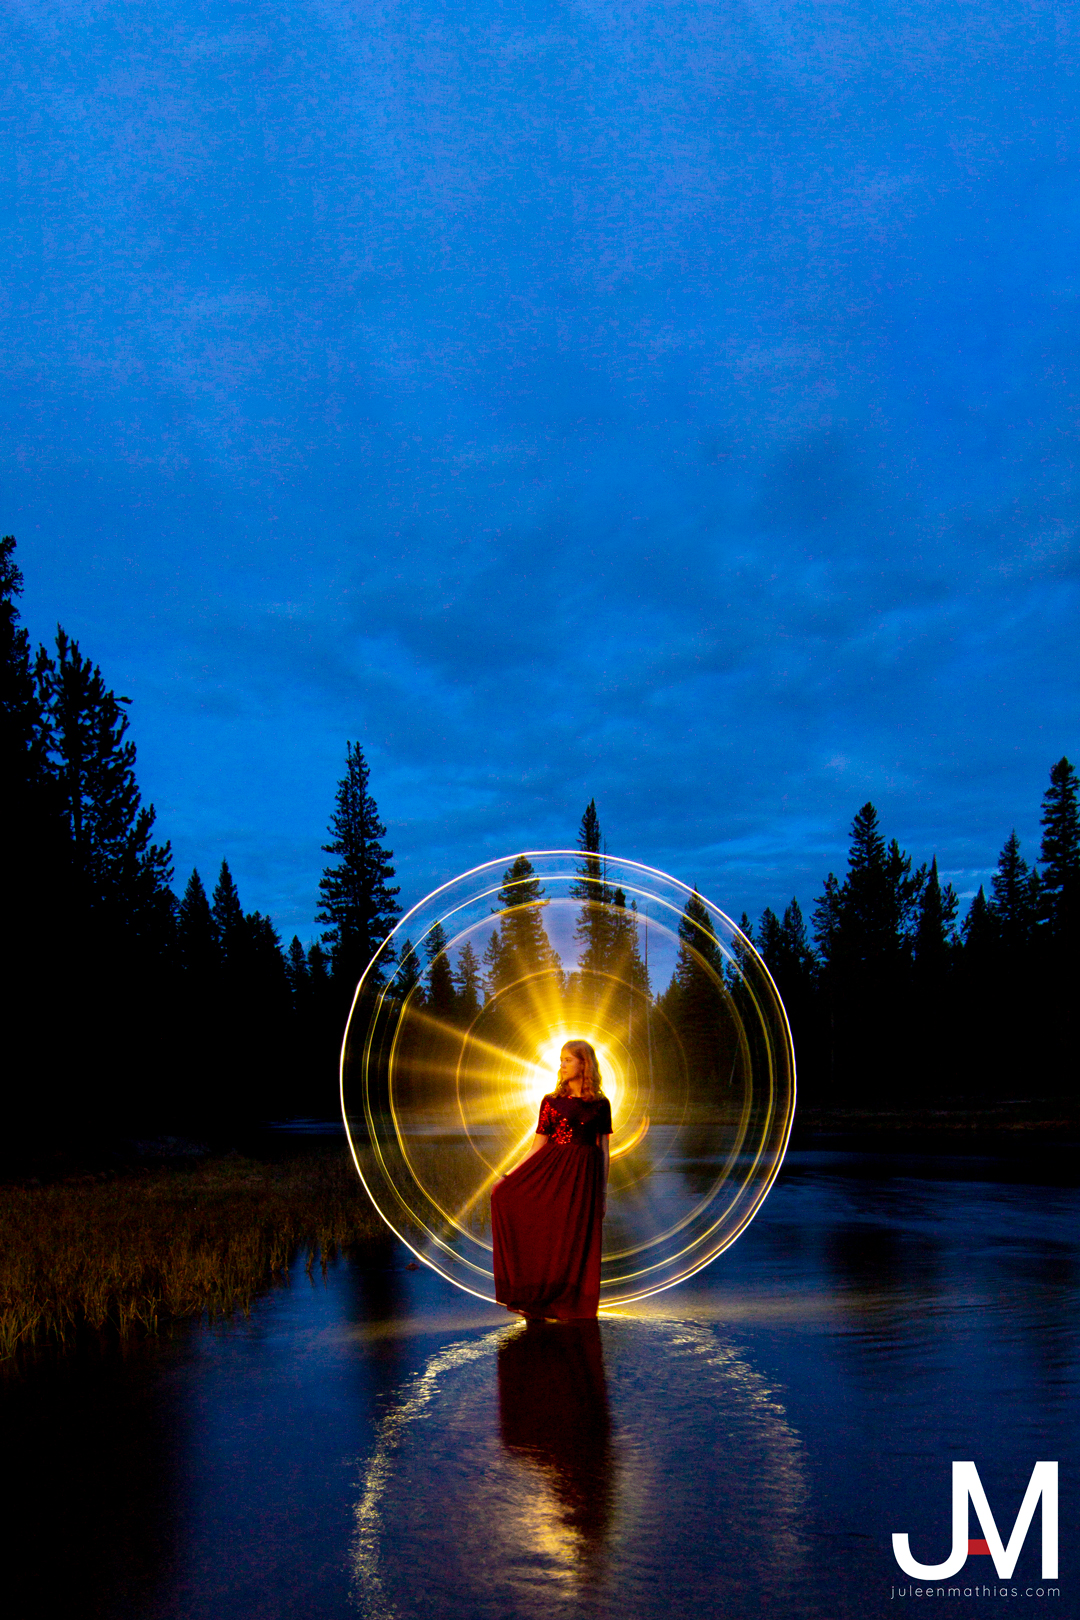
For this photo, we had the model stand in the river while someone slowly spun a light tube around them. This created the halo while also keeping the starburst around the model. My shutter speed was at 20 seconds, with my aperture at f/10 and ISO 100.
In post production, I used content-aware in the sky to move my subject to be on the one-third line and create a better balance. I enhanced the colors and brightness as well.
Swirly Twirly
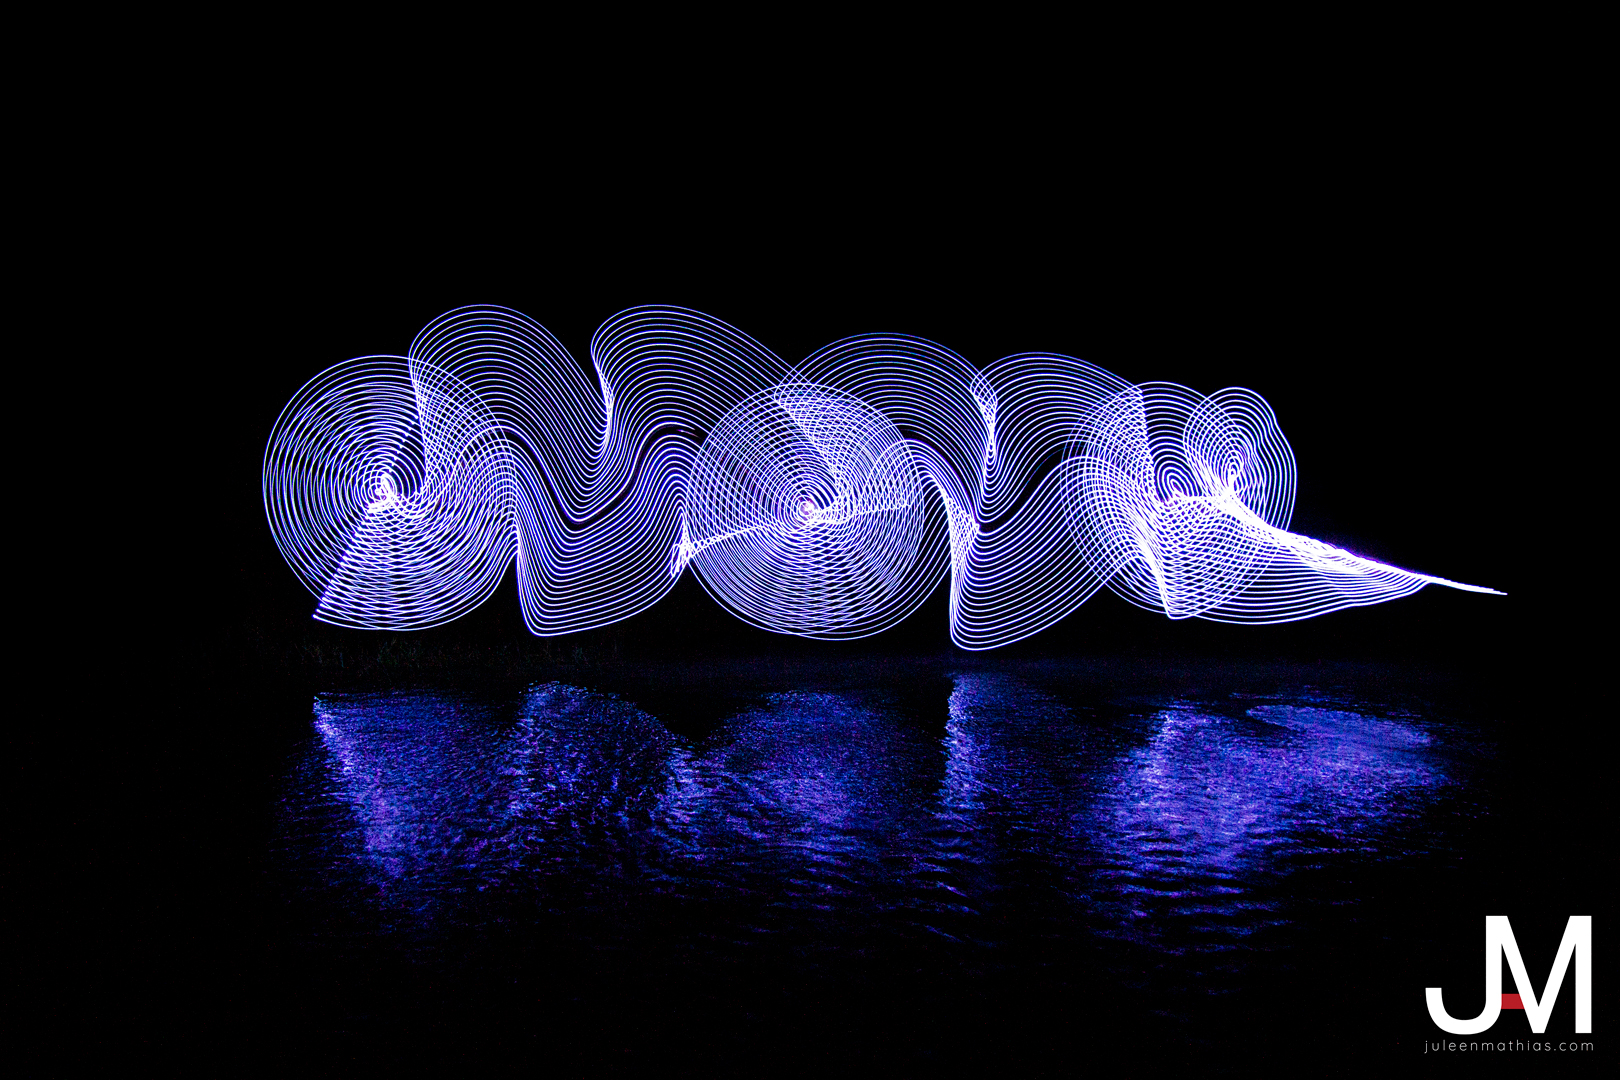
For the setup of this photo, someone ran around in a river and a light tube spinning around to create this swirl of light trails. My shutter speed was at 13 seconds, with an aperture of f/5 and ISO 1600.
In post production, I darkened the blacks and increased the highlights and saturation.
Lonely Nights
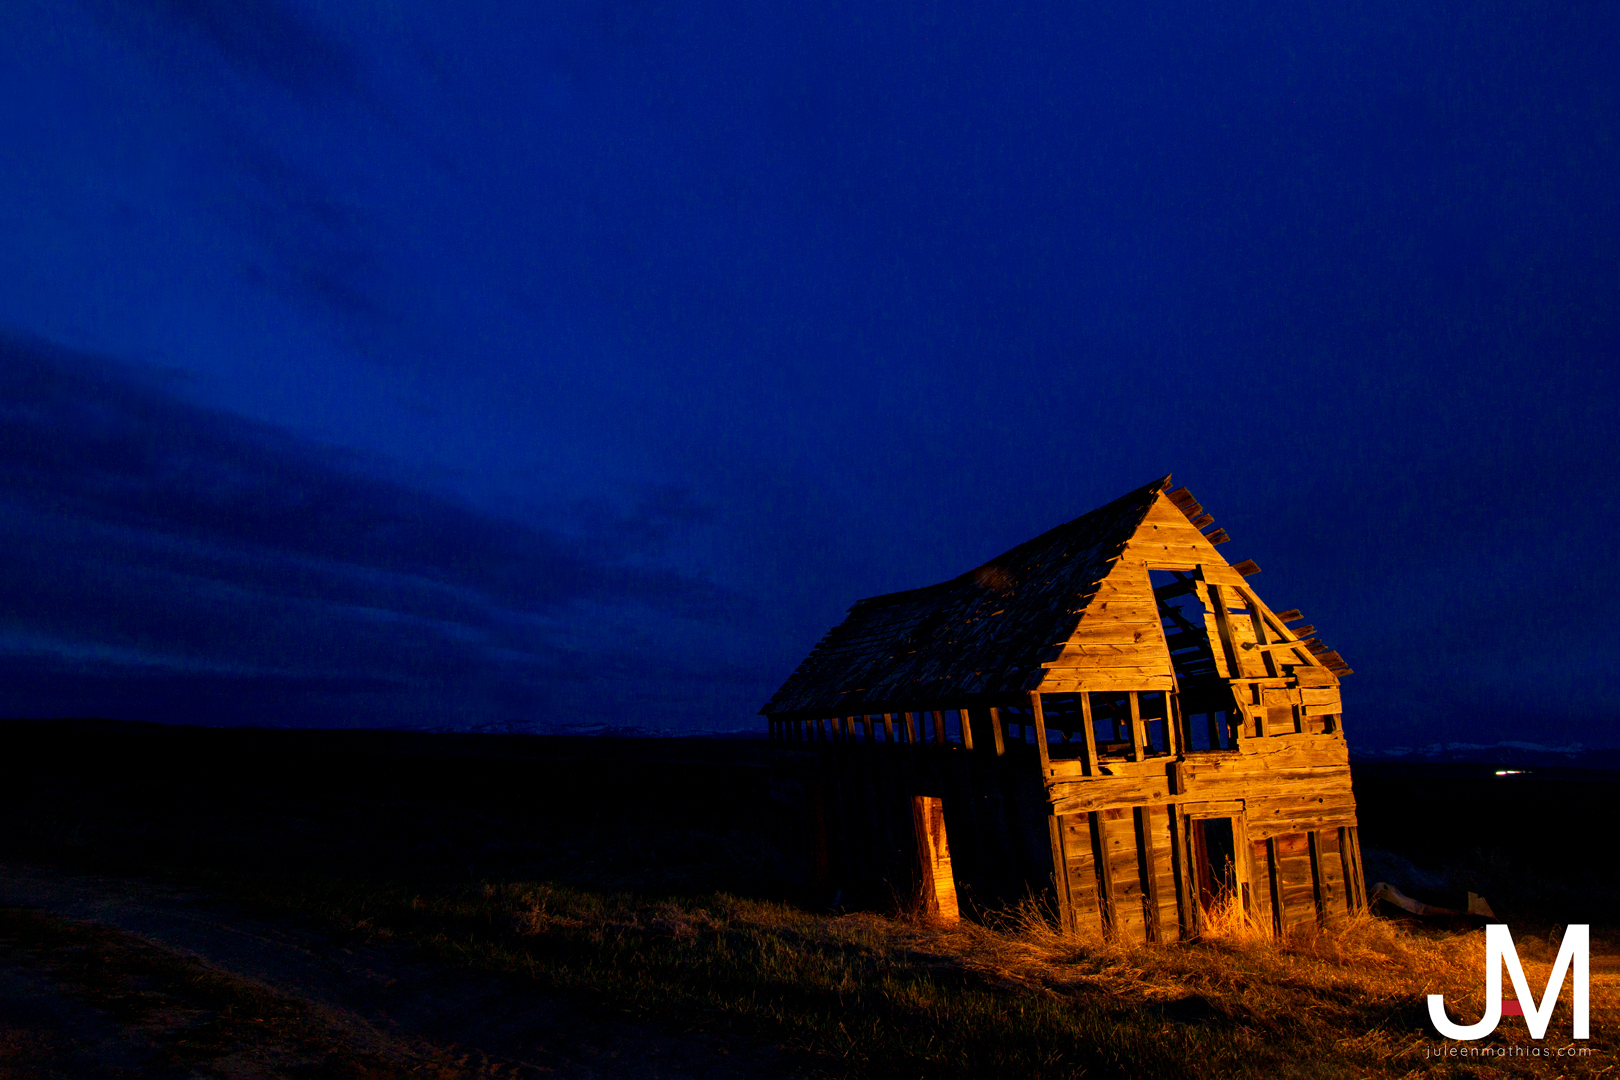
With this gorgeous, abandoned cabin as the subject, I was able to photograph its beauty during blue hour. As the sun went down, the flashlight came out to shine on the face of the building and highlight it among the dark night sky. My shutter speed was at 20 seconds, with an aperture of f/11 and ISO 400.
In post production, I made the sky a deeper blue and straightened the photo.
Downstream
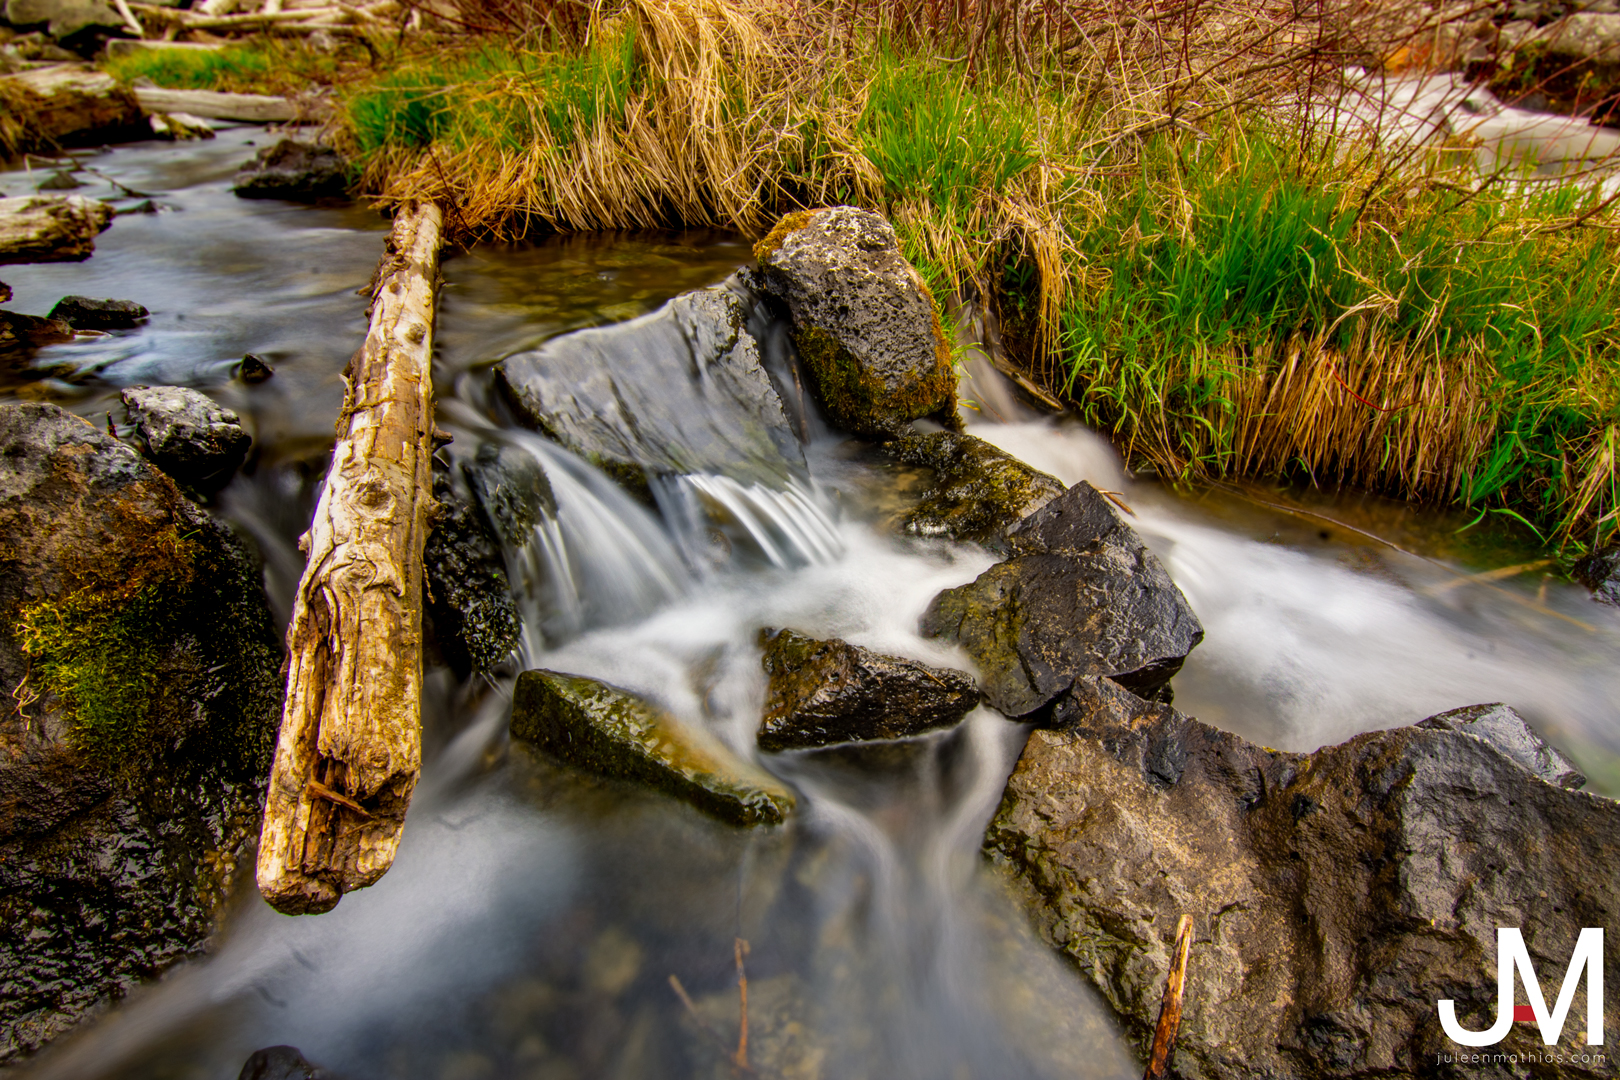
This photo is a bit different than the other ones I have posted throughout this blog post. Can you spot the difference? It’s during the day! Because of this, I had to severely edit my settings. To capture this beautiful, slow-moving water, I put my camera on a tripod in the river and bracketed three different images. My main shutter speed was at 2 seconds, with an aperture of f/22 and ISO 100.
In post production, I enhanced the saturation and sharpness in certain areas. I really wanted the rocks and tree branch to stand out, so I focused on those.
Long exposure photography can truly transform a photo into something magnificent. As I continue to practice these skills, I know the quality of my photography will increase.
Indoor Light Painting
Give indoor light painting a try!
There are many ways to enhance your indoor setup with the use of light painting. Just bring a flashlight, tripod and camera into a dark room and let your creativity soar.
Farmhouse Morning

For this first setup, I really wanted to show off the farmhouse vibe of an early morning sunrise. With the light forming a triangle between the subject and camera, it created some beautiful mood lighting. Since the milk and eff are the main focus of this piece, it got a little bit of top lighting to bring out the highlights.
In post production, I cloned out some light trails that the camera picked up and did some dodging and burning to enhance the photo even more.
American Truck
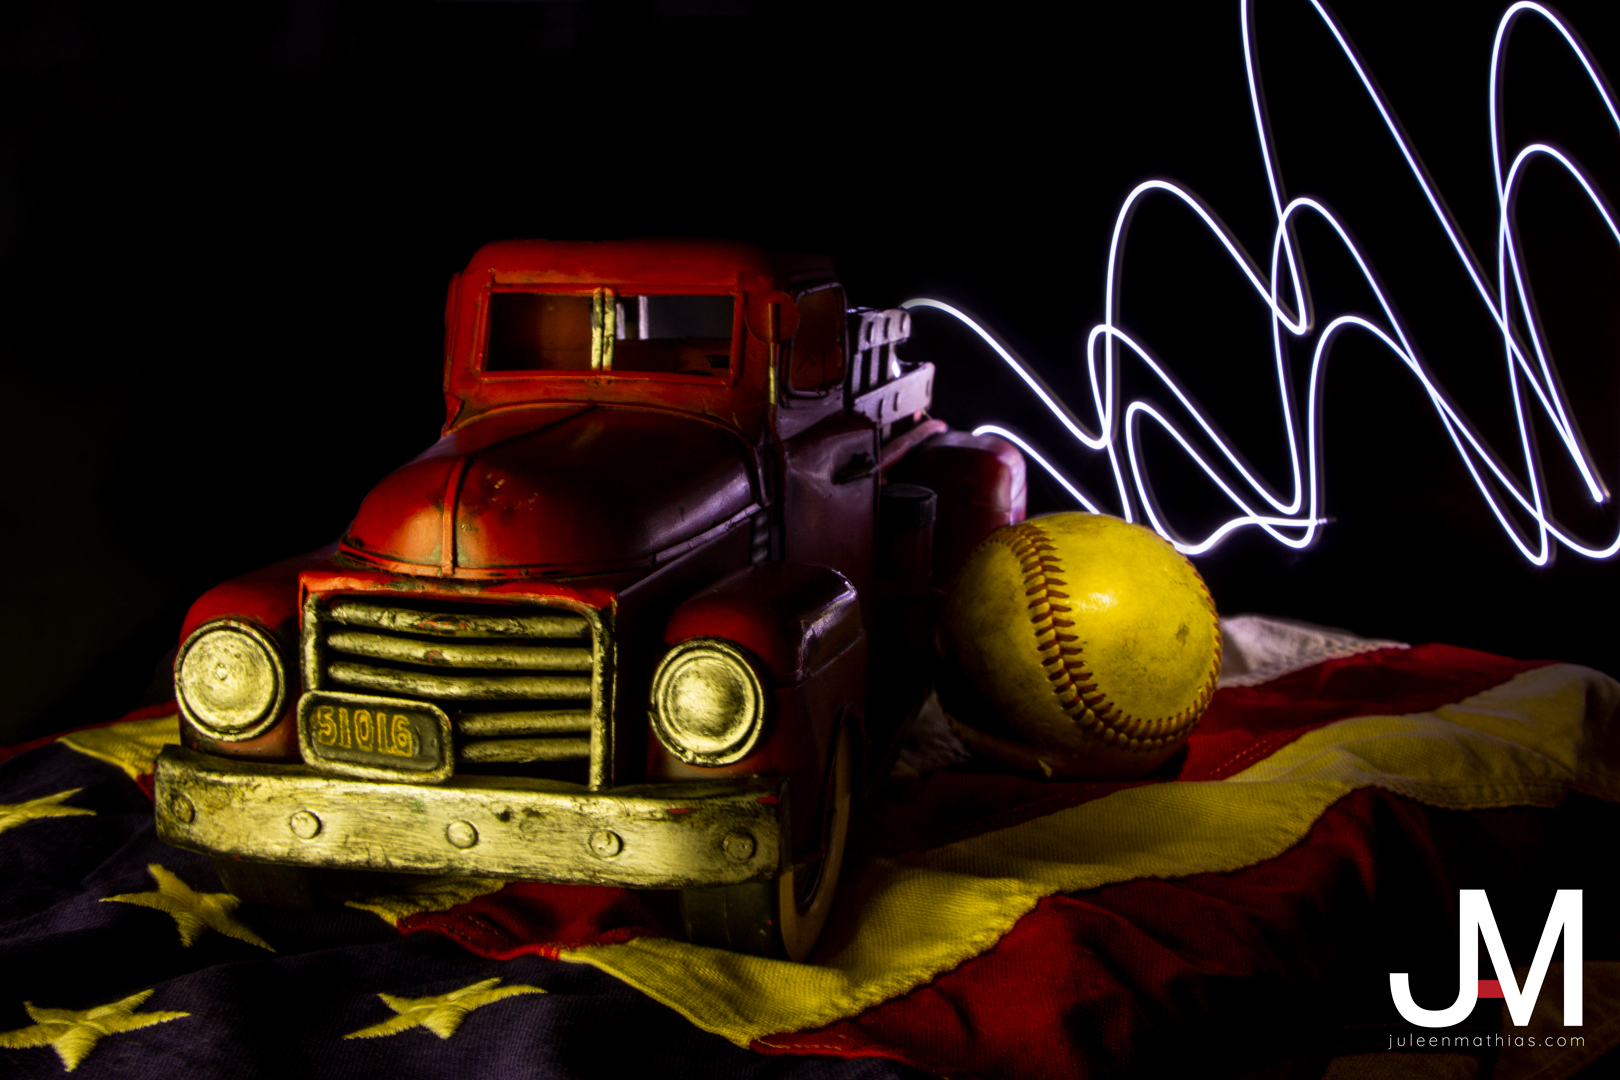
I wanted this second setup to show the light trail in the background of the photo. I wanted it to look as if the car was in motion and leaving trails behind it. With a dim light and a diffuser, a soft light was shining on the front of the car with a quick spotlight on the baseball. This one took a few tries since the baseball is so much brighter and shinier than the rest of the photo.
In post production, I darkened the background to remove the texture of the black cloth. I felt it looked more dramatic with the pitch black background.
Pop!

In this setup, I placed different colored soda bottles on top of a piece of frosted plexiglass with an LED light underneath. By spraying the bottles with water, it created the illusion that they were chilled glasses. With another light used as a side lighting, the caps were able to be illuminated like the rest of the bottle.
In post production, I used content-aware to crop out of the photo since it was too tight. This created a larger black background.
Under the Sea

In this setup, we placed seashells on a burlap cloth with kinetic sand scattered throughout. As we used a blue and red light from either side of the setup, it created a purple light mixture. To create the illusion of water reflections, we shined a light through some iridescent plastic wrapping paper.
In post production, I altered the hues and saturation of colors.
Overall, this was a huge learning experience that helped me to become familiar with my camera settings in the dark and understand the importance of lighting.
Scanner Art and Cinemagraphs
Scanner Art and Cinemagraphs
Creative photography of scanner art and cinemagraphs.
Scanner Art
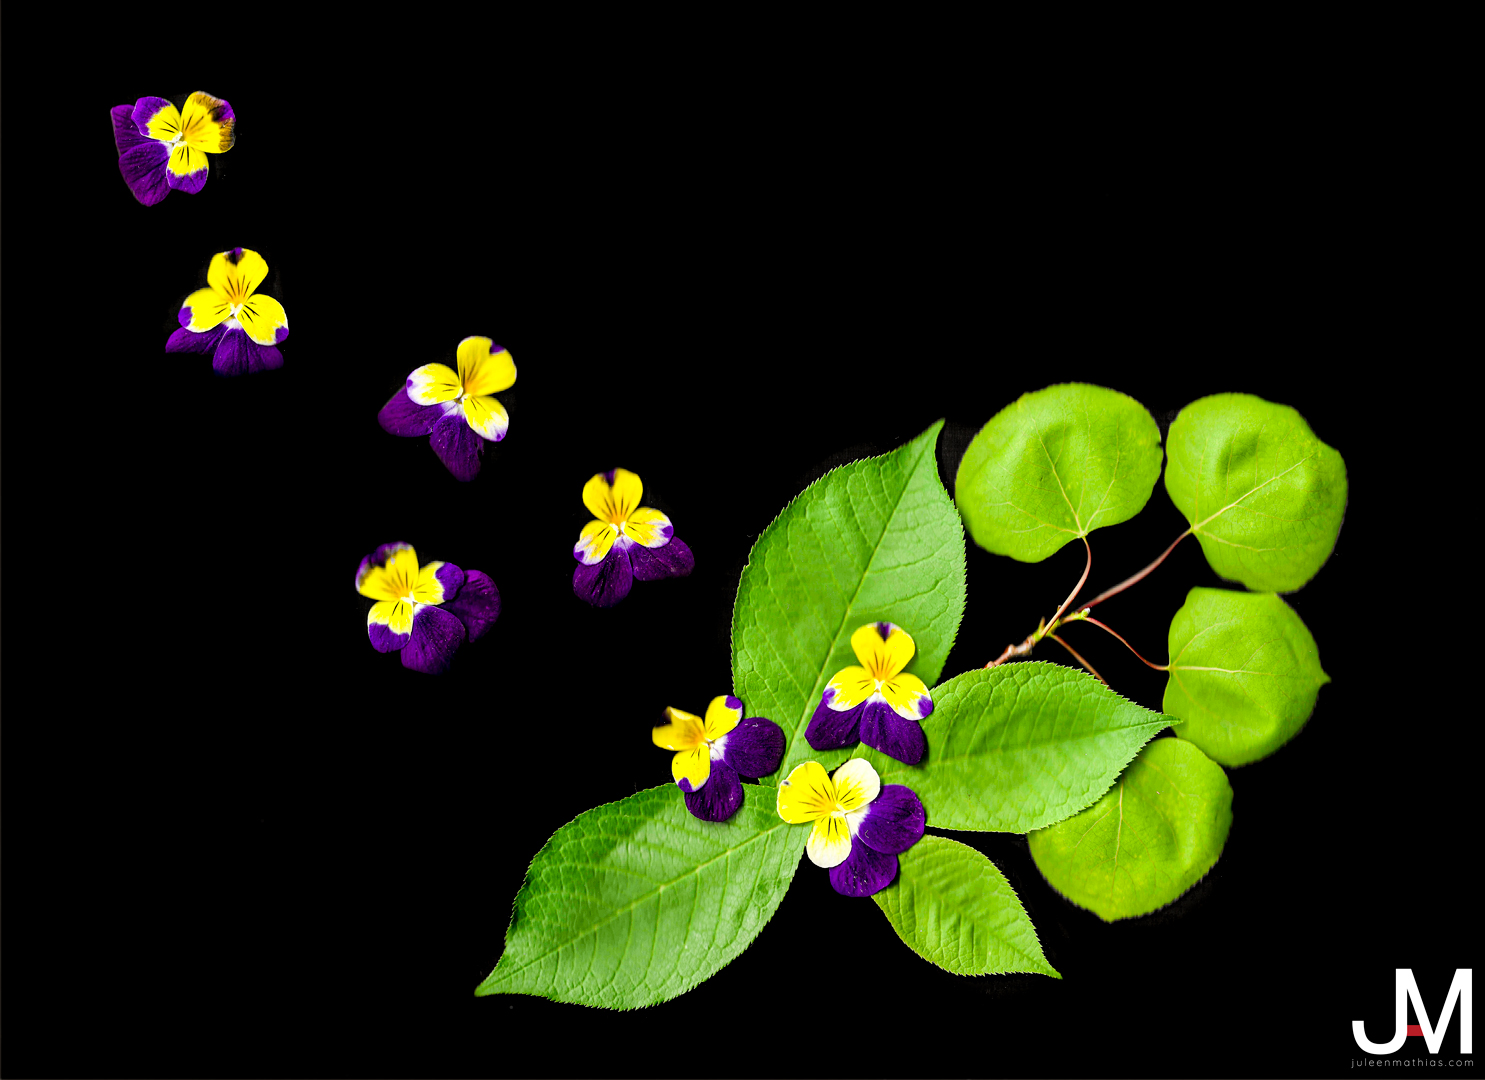
Scan art is such a unique art. Some photographers, such as Kelsey Hamilton have truly mastered the creative style of scanography. Trying to put my own spin on things, I took to the garden to pick some leaves and flowers. After a few tried of adding and taking away leaves, I finally was able to get this balanced layout. To create a black background, I covered a cookie sheet covered with a black cloth.
Since the black cloth had a bit more texture to it than I liked, I fixed it in post production. I softened the details and darkened the blacks with a selective mask to create a beautiful black background to this scan art.
Cinemagraph
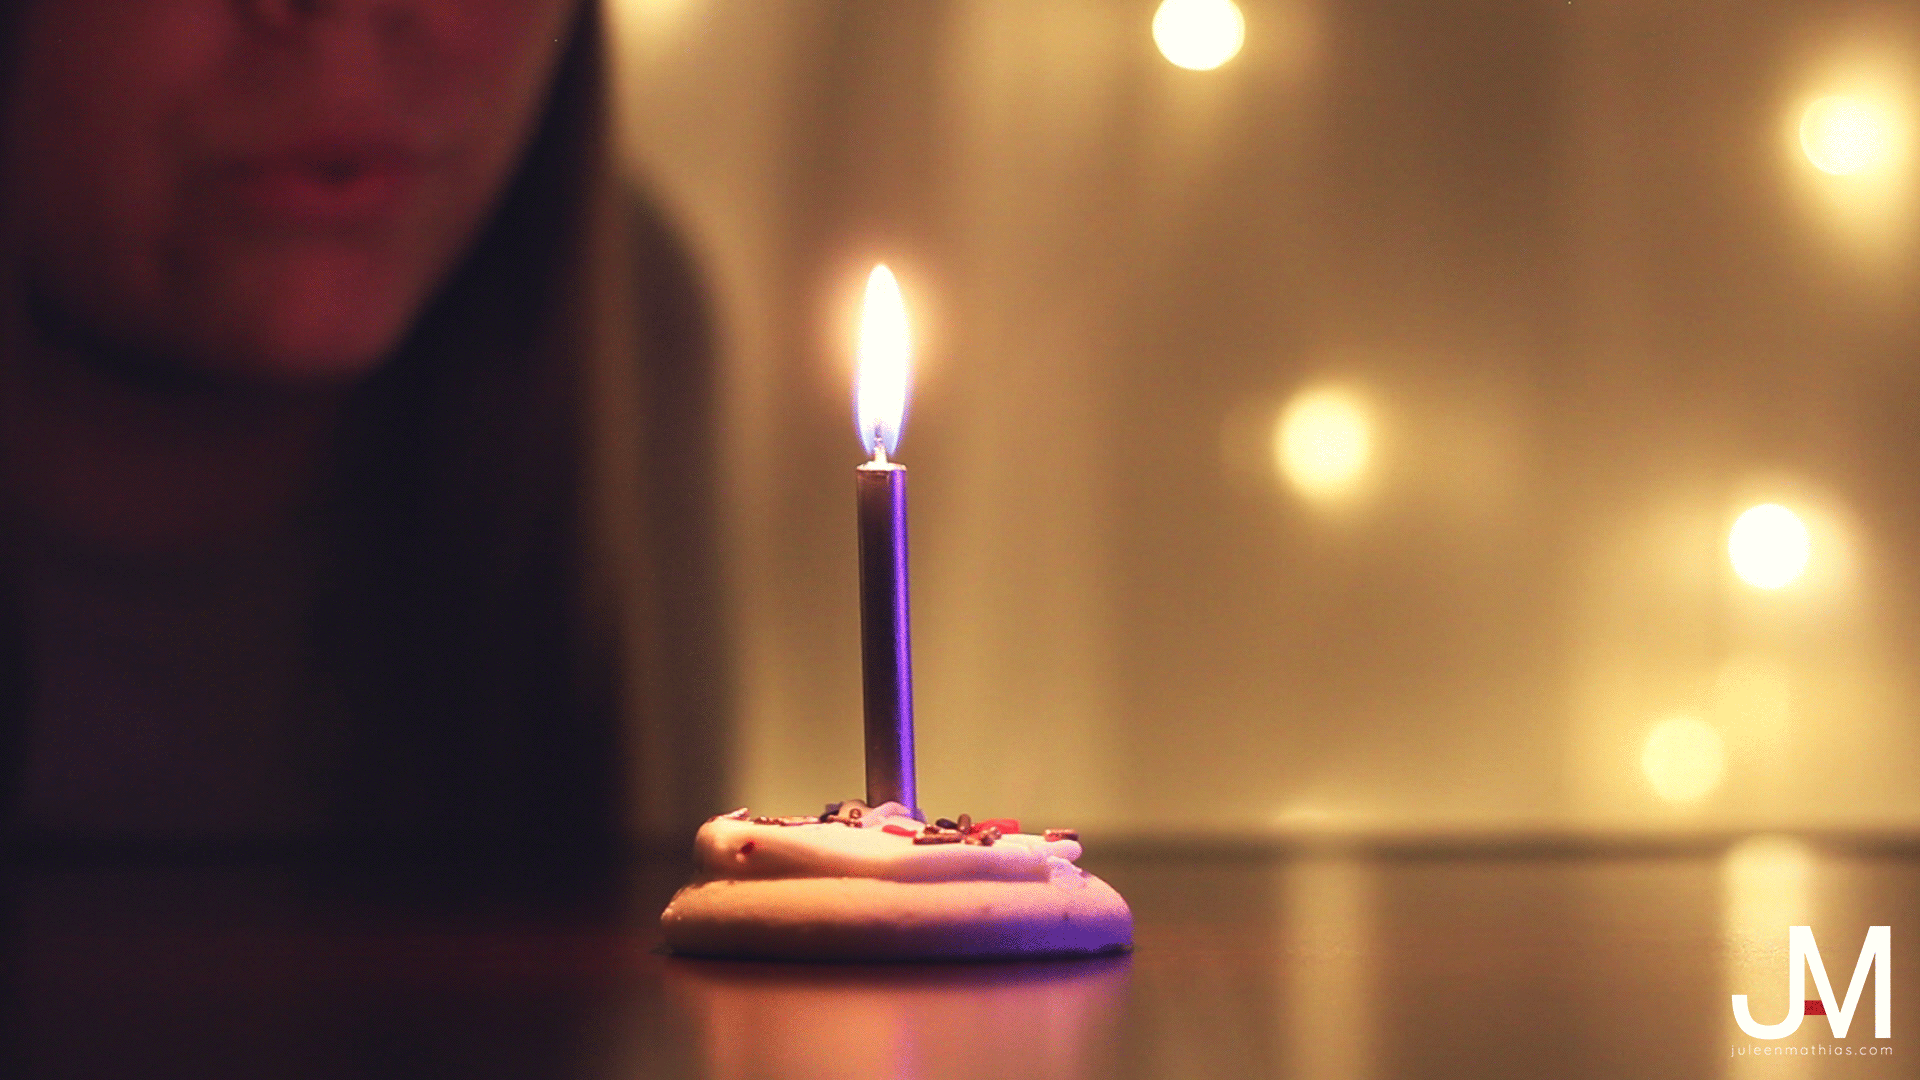
Cinemagraphs are a way of combining photography and videography into one. It has become more popular for people to learn how to make their own cinemagraphs. Ready to take on the challenge for myself, I began to brainstorm some ideas I could test out.
After failing a couple of different experiments, I grabbed a cookie and a candle. To create the purple glow as side lighting, I pulled up a purple screen on my laptop at full brightness (use your resources to the fullest). The simplicity of softly blowing on the flame made for a beautiful shot.
I uploaded the video into Photoshop and cut the piece that I liked the best. By masking out only part of the video to move while leaving a still image layered on top. I created this effect that time stopped to watch this flame flicker.
Throughout creating these two images, I learned a lot in the ways of perserverence. There will be many times where I will be faced with a new challenge in the world of art. It is up to me to grow and understand the changes happening around me. After playing around a bit, I cannot wait to create some new cinemagraph and scanner art in the future.
This is Juleen Mathias